NeatSeq-Flow Tutorial
Author: Liron Levin
This tutorial describes how to create and execute the workflow described in the NeatSeq-Flow manuscript (Article on BioRXiv).
Table of Contents:
Short Description
The example workflow receives FASTQ files and performs:
- Quality testing and trimming of the raw sequence reads (paired- or single-end).
- Alignment (“mapping”) of the reads to a reference genome using two different programs.
- Sorting the samples’ BAM files as final results.
- Creation of a report on reads and mapping quality.
The input files in this tutorial are whole genome sequenced bacteria, and the resulting BAM files may be used for subsequent variant calling and other analyses.
The example workflow is distributed as part of NeatSeq-Flow for quick testing.
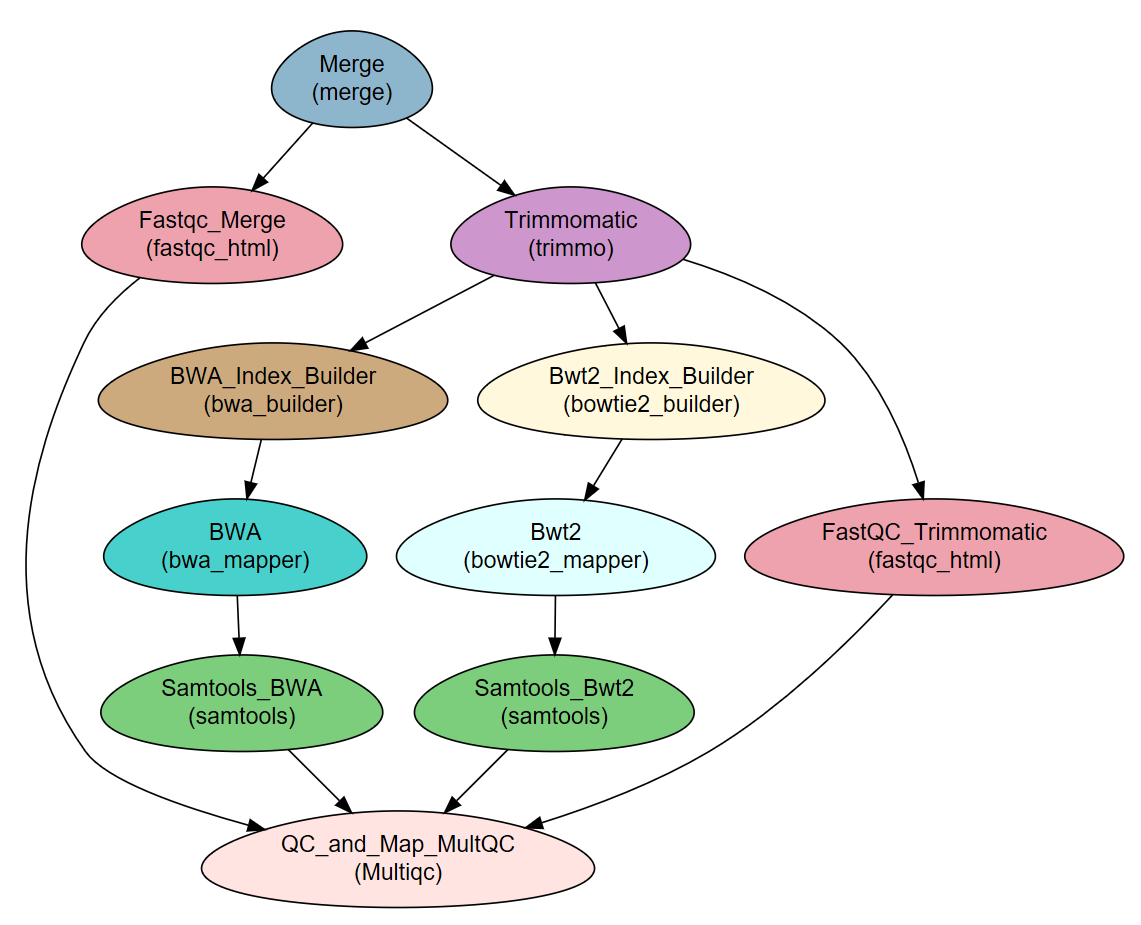
The workflow consists of the following steps:
| Step | Module | Program |
|---|---|---|
| Merge | Import | |
| Fastqc_Merge | fastqc_html | fastqc |
| Trimmomatic | trimmo | trimmomatic |
| FastQC_Trimmomatic | fastqc_html | fastqc |
| BWA_Index_Builder | bwa_builder | bwa |
| BWA | bwa_mapper | bwa |
| Bwt2_Index_Builder | bowtie2_builder | bowtie2 |
| Bwt2 | bowtie2_mapper | bowtie2 |
| Samtools_BWA | samtools | samtools |
| Samtools_Bwt2 | samtools | samtools |
| QC_and_Map_MultQC | Multiqc | MultiQC |
Workflow Schema
Required data
This WF requires samples with fastq file(s) (paired or single) and a reference genome in fasta format.
Note
- The files for the tutorial are included in the installation procedure below.
- The three samples used in this example workflow are SRR453031, SRR453032 and SRR453033 from Staphylococcus aureus subsp. aureus Genome Sequencing project (BioProject PRJNA157545). The Staphylococcus aureus GCF_000284535.1 genome assembly was used as reference genome.
- To save run-time and space, the raw sample files contain only the first 500,000 lines each.
Required programs
- fastqc
- trimmomatic
- multiqc
- samtools=1.3
- BWA
- bowtie2
Note
The programs are installed as part of the installation process using CONDA.
Install NeatSeq-Flow
In this Tutorial we will install NeatSeq-Flow and all it’s dependencies in one go with a provided bash script.
The script performs the following:
- Miniconda installation
gitinstallation- NeatSeq-Flow conda environment creation
Everything will be installed in a directory called NeatSeq_Flow_install in your HOME directory. To uninstall NeatSeq-Flow, just delete the directory.
cd $HOME
curl -LO https://raw.githubusercontent.com/bioinfo-core-BGU/neatseq-flow/master/docs/source/_extra/extra/NeatSeq_Flow_install_script.sh
bash NeatSeq_Flow_install_script.sh temp
export PATH=$HOME'/NeatSeq_Flow_install/bin:'$PATH
Note
To keep conda in your PATH, whenever opening a new terminal type this command:
export PATH=$HOME'/NeatSeq_Flow_install/bin:'$PATH
Setup the Tutorial Work-Flow
In this part we will:
- Create a Tutorial directory
- Create the Tutorial conda environment
- Download the Tutorial’s Work-Flow parameter file
- Download the Tutorial’s Work-Flow Sample’s file
Create a Tutorial directory
In the command line type:
mkdir Tutorial
cd Tutorial
Create the Tutorial conda environment
This step will download and install all the Required programs for this Tutorial Work-Flow.
Download the NeatSeq Flow Tutorial installer file:
curl https://raw.githubusercontent.com/bioinfo-core-BGU/neatseq-flow-tutorial/master/NeatSeq_Flow_Tutorial_Install.yaml > NeatSeq_Flow_Tutorial_Install.yamlCreate the NeatSeq_Flow_Tutorial conda environment:
conda env create -f NeatSeq_Flow_Tutorial_Install.yaml
Download the Tutorial’s Work-Flow parameter file
In the command line type:
curl https://raw.githubusercontent.com/bioinfo-core-BGU/neatseq-flow-tutorial/master/Example_WF_conda_env.yaml > Tutorial_Parameter_file.yaml
Download the Tutorial’s Work-Flow Sample’s file
In the command line type:
curl https://raw.githubusercontent.com/bioinfo-core-BGU/neatseq-flow-tutorial/master/Samples_conda.nsfs > Tutorial_Samples_file.nsfs
Note
- The sample’s file indicate the files that will be used in this analysis.
- These files were downloaded when the Tutorial’s conda environment was created in the Create the Tutorial conda environment step and are found within the conda environment itself
Title   Example_WF_From_the_manuscript

#Type   Path
Nucleotide      /$CONDA_PREFIX/TUTORIAL/Data/Reference_genome.fasta

#SampleID       Type    Path
Sample1 Forward /$CONDA_PREFIX/TUTORIAL/Data/Sample1.F.fastq.gz
Sample1 Reverse /$CONDA_PREFIX/TUTORIAL/Data/Sample1.R.fastq.gz
Sample2 Forward /$CONDA_PREFIX/TUTORIAL/Data/Sample2.F.fastq.gz
Sample2 Reverse /$CONDA_PREFIX/TUTORIAL/Data/Sample2.R.fastq.gz
Sample3 Forward /$CONDA_PREFIX/TUTORIAL/Data/Sample3.F.fastq.gz
Sample3 Reverse /$CONDA_PREFIX/TUTORIAL/Data/Sample3.R.fastq.gz
- The “$CONDA_PREFIX” indicate the location of the Tutorial’s conda environment.
Learn How to use the Graphical User Interface
Typically, the installation of both NeatSeq-Flow and its GUI is done on a Linux operating system. It is then possible to use the GUI from a Windows computer through a Windows X server such as MobaXterm.
In this part of the Tutorial we will:
Prerequisites
- The computer where the GUI is installed needs to have a web browser, preferably FireFox.
- To use the GUI from another computer having a Windows operating system, that computer needs to have a Windows X server, e.g. MobaXterm.
Activate the GUI
Activate the NeatSeq_Flow conda environment:
bash
source activate NeatSeq_Flow
Run NeatSeq_Flow_GUI:
NeatSeq_Flow_GUI.py
Learn How to Create a Work-Flow
Add New Step:

In the ‘Work-Flow’ Tab choose a module template and click on the ‘Create New Step’ button.
Change Step Name:

You can change the new step name by clicking on the step name and edit the key field and then click the ‘Edit’ button to set the change.
To determine the position of the new step in the work-flow:
- Click on the step button to see the step options
- Click on the base option
- Click on the ‘Value options’ drop-down menu
- Choose a previous step and click the ‘Add’ button. This can be repeated to choose several previous steps.
- Click the ‘Edit’ button to set the changes.
Add new step option:
- Click on the step’s name (or a step option to create a new sub option)
- Click on the ‘New’ button.
- It is possible to edit the new option name and value by editing the ‘Key’ field and the ‘Value’ field, it is also possible to choose from the ‘Value options’ drop-down menu.
- Click the ‘Edit’ button to set the changes.
Edit step’s options:

- Click on the step’s option name and change the ‘Key’ field and/or the ‘Value’ field, it is also possible to choose from the ‘Value options’ drop-down menu.
- When using the ‘Value options’ drop-down menu, in some cases it is possible to choose variables that are defined in the ‘Vars’ Tab. They will appear in the form of {Vars.some_field.some_sub_field} to indicate the value found in the ‘Vars’ Tab in the some_sub_field field ( which is a sub field of ‘some_field’ ).
- It is possible to choose file location as a value to the ‘Value’ field by clicking on the ‘Browse’ button.
- Click the ‘Edit’ button to set the changes.
Duplicate field or step:
- Click on the step’s name (to duplicate the step) or on a step’s option name (to duplicate the option and it’s sub fields)
- Click the ‘Duplicate’ button
Remove field or step:
- Click on the step’s name (to remove the step) or on a step’s option name (to remove the option and it’s sub fields)
- Click the ‘Remove’ button
Configure the Used Variables in the Work-Flow
Edit Variables:
In the ‘Vars’ Tab choose a variable name to edit, change the key or value and then click on the ‘Edit’ button.
Create New Variable:
- You can create new variable by clicking on some existing variable name and then click the ‘New Field’ button.
- You can create new sub variable by clicking on the existing variable to which you want to create a sub variable and then click the ‘New Sub Field’ button.
Load a Work-Flow Parameter File
Load a Parameter file:

- In the ‘Work-Flow’ Tab click on the ‘Load WorkFlow’ button, then choose the work-flow’s parameter file ‘Tutorial_Parameter_file.yaml’ and click open.
Configure a Sample file
In the ‘Samples’ Tab:
Edit The Project Title Name:
- You can edit the project title name by clicking on the Project Title name.
Add a Sample/Project File:
- You can add a sample/project file by clicking the ‘Add Sample File’ or ‘Add project File’ button and choose a file/s.
Load a Sample file:
- Click on the ‘Load Sample File’ button, then choose the work-flow’s sample file ‘Tutorial_Samples_file.nsfs’ and click open.
- You can edit the names of the samples by clicking on the sample name.
- You can remove a sample/project file by clicking the ‘Remove’ button.
- You can change a sample/project file type by clicking the drop-down menu or by editing the type name.
Configure the Cluster information
Edit Field:
In the ‘Cluster’ Tab choose a field name to edit, change the key or value and then click on the ‘Edit’ button.
Create New Field:
- You can create new field by clicking on some existing field name and then click the ‘New Field’ button.
- You can create new sub field by clicking on the existing field to which you want to create a sub field and then click the ‘New Sub Field’ button.
Run the Work-Flow
If NeatSeq-Flow is installed using conda (as in this Tutorial): Choose the conda environment of which NeatSeq-Flow installed in.
If NeatSeq-Flow is installed Locally: Choose the neatseq_flow.py script location.
In order to Generate the Work-Flow scripts:
- Select the Sample file.
- Select the Work-Flow parameter-file.
- Choose the Project Directory to generate the Work-Flow’s scripts in (the default is to use the Current Working Directory )
- Click on the ‘Generate scripts’ button.
To run the Work-Flow click on the ‘Run scripts’ button
It is possible to monitor the Work-Flow progress by clicking the ‘Run Monitor’ button
Note
It is possible to terminate the current run by clicking on the ‘Kill Run’ button.
Learn how to use the Command Line Interface
To Run the Tutorial Work-Flow in a command line Interface:
Activate the NeatSeq_Flow conda environment:
bash
source activate NeatSeq_Flow
Generate the scripts by typing in the command line:
neatseq_flow.py -s Tutorial_Samples_file.nsfs -p Tutorial_Parameter_file.yamlNote
It is possible to indicate the Project Directory to generate the Work-Flow’s scripts in using the -d option (the default is to use the Current Working Directory )
It is possible to see all NeatSeq-Flow’s options by typing:
neatseq_flow.py -h
Run the Work-Flow by typing in the command line:
bash scripts/00.workflow.commands.sh 1> null &Run the Work-Flow monitor by typing in the command line:
neatseq_flow_monitor.pyNote
It is possible to terminate the current run by typing:
bash scripts/99.kill_all.sh
Contact
Please contact Liron Levin at: levinl@post.bgu.ac.il