NeatSeq-Flow Tutorial

Author: Liron Levin

This tutorial describes how to create and execute the workflow described in the NeatSeq-Flow manuscript (Article on BioRXiv).

Short Description

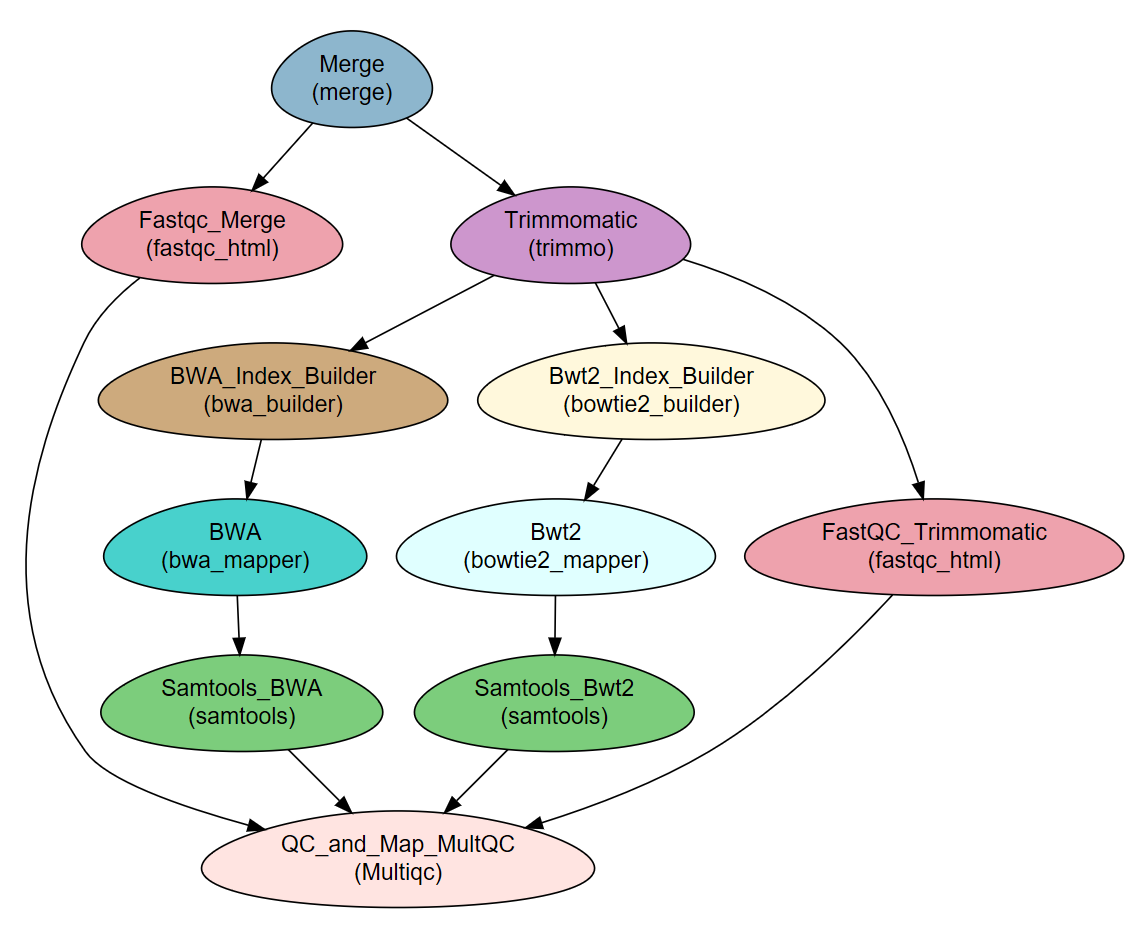
The example workflow receives FASTQ files and performs:

  • Quality testing and trimming of the raw sequence reads (paired- or single-end).
  • Alignment (“mapping”) of the reads to a reference genome using two different programs.
  • Sorting the samples’ BAM files as final results.
  • Creation of a report on reads and mapping quality.

The input files in this tutorial are whole genome sequenced bacteria, and the resulting BAM files may be used for subsequent variant calling and other analyses.

The example workflow is distributed as part of NeatSeq-Flow for quick testing.

The workflow consists of the following steps:

Step Module Program
Merge Import
Fastqc_Merge fastqc_html fastqc
Trimmomatic trimmo trimmomatic
FastQC_Trimmomatic fastqc_html fastqc
BWA_Index_Builder bwa_builder bwa
BWA bwa_mapper bwa
Bwt2_Index_Builder bowtie2_builder bowtie2
Bwt2 bowtie2_mapper bowtie2
Samtools_BWA samtools samtools
Samtools_Bwt2 samtools samtools
QC_and_Map_MultQC Multiqc MultiQC

Workflow Schema

Example Workflow DAG

Required data

This WF requires samples with fastq file(s) (paired or single) and a reference genome in fasta format.

Note

  • The files for the tutorial are included in the installation procedure below.
  • The three samples used in this example workflow are SRR453031, SRR453032 and SRR453033 from Staphylococcus aureus subsp. aureus Genome Sequencing project (BioProject PRJNA157545). The Staphylococcus aureus GCF_000284535.1 genome assembly was used as reference genome.
  • To save run-time and space, the raw sample files contain only the first 500,000 lines each.

Required programs

  • fastqc
  • trimmomatic
  • multiqc
  • samtools=1.3
  • BWA
  • bowtie2

Note

The programs are installed as part of the installation process using CONDA.

Install NeatSeq-Flow

Installing Using Conda will install NeatSeq-Flow with all its dependencies in one go:
  • First if you don’t have Conda, install it!

  • Then in the terminal:

    1. Create the NeatSeq_Flow conda environment:
    conda env create levinl/neatseq_flow
    

Setup the Tutorial Work-Flow

In this part we will:

Create a Tutorial directory

  • In the command line type:

    mkdir Tutorial
    cd Tutorial
    

Create the Tutorial conda environment

This step will download and install all the Required programs for this Tutorial Work-Flow.

  1. Create the NeatSeq_Flow_Tutorial conda environment:

    conda env create levinl/neatseqflowtutorial
    

Download the Tutorial’s Work-Flow parameter file

  • In the command line type:

    curl https://raw.githubusercontent.com/bioinfo-core-BGU/neatseq-flow-tutorial/master/Example_WF_conda_env.yaml > Tutorial_Parameter_file.yaml
    

Download the Tutorial’s Work-Flow Sample’s file

  • In the command line type:

    curl https://raw.githubusercontent.com/bioinfo-core-BGU/neatseq-flow-tutorial/master/Samples_conda.nsfs > Tutorial_Samples_file.nsfs
    

Note

  • The sample’s file indicate the files that will be used in this analysis.
  • These files were downloaded when the Tutorial’s conda environment was created in the Create the Tutorial conda environment step and are found within the conda environment itself
Title   Example_WF_From_the_manuscript

#Type   Path
Nucleotide      /$CONDA_PREFIX/TUTORIAL/Data/Reference_genome.fasta

#SampleID       Type    Path
Sample1 Forward /$CONDA_PREFIX/TUTORIAL/Data/Sample1.F.fastq.gz
Sample1 Reverse /$CONDA_PREFIX/TUTORIAL/Data/Sample1.R.fastq.gz
Sample2 Forward /$CONDA_PREFIX/TUTORIAL/Data/Sample2.F.fastq.gz
Sample2 Reverse /$CONDA_PREFIX/TUTORIAL/Data/Sample2.R.fastq.gz
Sample3 Forward /$CONDA_PREFIX/TUTORIAL/Data/Sample3.F.fastq.gz
Sample3 Reverse /$CONDA_PREFIX/TUTORIAL/Data/Sample3.R.fastq.gz
  • The “$CONDA_PREFIX” indicate the location of the Tutorial’s conda environment.

Learn How to use the Graphical User Interface

Typically, the installation of both NeatSeq-Flow and its GUI is done on a Linux operating system. It is then possible to use the GUI from any computer through a web-browser.

In this part of the Tutorial we will:

Activate the GUI

  1. Activate the NeatSeq_Flow conda environment:
bash
source activate NeatSeq_Flow
  1. Run NeatSeq_Flow_GUI:
NeatSeq_Flow_GUI.py --Server
  1. Use the information in the terminal:

    https://github.com/bioinfo-core-BGU/NeatSeq-Flow-GUI/raw/master/doc/NeatSeq-Flow_Server.jpg
    • Copy the IP address to a web-browser - (red line)
    • A login window should appear
    • Copy the “User Name” (blue line) from the terminal to the “User Name” form in the login window
    • Copy the “Password” (yellow line) from the terminal to the “Password” form in the login window
    • Click on the “Login” button.
  2. Managing Users:
    • It is possible to mange users using SSH, NeatSeq-Flow will try to login by ssh to a host using the provided “User Name” and “Password”.
    • The ssh host can be local or remote.
    • Note: If using a remote host, NeatSeq-Flow needs to be installed on the remote host and the analysis will be run on the remote host by the user that logged-in
NeatSeq_Flow_GUI.py --Server --SSH_HOST 127.0.0.1
  1. For more option:
NeatSeq_Flow_GUI.py -h

usage: NeatSeq_Flow_GUI.py [-h] [--Server] [--PORT CHAR] [--HOST CHAR] [--SSL]
                   [--SSH_HOST CHAR] [--SSH_PORT CHAR] [--USER CHAR]
                   [--PASSW CHAR] [--USERSFILE CHAR]
                   [--UNLOCK_USER_DIR] [--WOKFLOW_DIR CHAR]
                   [--CONDA_BIN CHAR] [--LOG_DIR CHAR]

NeatSeq-Flow GUI By Liron Levin

optional arguments:
  -h, --help          show this help message and exit
  --Server            Run as Server
  --PORT CHAR         Use this port in which to run the app, If not set will
                      search for open port (Works only When --Server is set)
  --HOST CHAR         The host name/ip to serve the app, If not set, will try
                      to identify automatically (Works only When --Server is
                      set)
  --SSL               Use SSL (Only When --Server is set)
  --SSH_HOST CHAR     Connect using SSH to a remote host, NeatSeq-Flow needs
                      to be installed on the remote host (Works only When
                      --Server is set)
  --SSH_PORT CHAR     When --SSH_HOST is set use this ssh port to connect to a
                      remote host.
  --USER CHAR         User Name For This Serve (Works only When --Server is
                      set)
  --PASSW CHAR        Password For This Serve (Works only When --Server is
                      set)
  --USERSFILE CHAR    The location of a Users file in which a list of users,
                      E-mails addresses and Users directories are separated by
                      one space (as:USER user@example.com /USER/DIR). The
                      login password will be send to the user e-mail after
                      filling its user name and the password generated at the
                      beginning of the run (Works only When --Server is set).
                      You will need a Gmail account to send the password to
                      the users (you will be prompt to type in your Gmail
                      address and password)
  --UNLOCK_USER_DIR   Don't Lock Users to their Directory Or to the Current
                      Working Directory
  --WOKFLOW_DIR CHAR  A Path to a Directory containing work-flow files to
                      choose from at log-in. Works only When --Server is set.
                      If --SSH_HOST is set, the Path needs to be in the remote
                      host.
  --CONDA_BIN CHAR    A path to a the CONDA bin location. If --SSH_HOST is
                      set, the Path needs to be in the remote host.
  --LOG_DIR CHAR      A path to a directory to save log files about users
                      statistics. Only woks If --Server is set. In any way the
                      path needs to be at the local host.

Load a Work-Flow Parameter File

  1. Load a Parameter file:

    https://raw.githubusercontent.com/bioinfo-core-BGU/NeatSeq-Flow-Using-Docker/master/doc/Load_WorkFlow_parameter_file.gif
    • In the ‘Work-Flow’ Tab click on the ‘Load WorkFlow’ button, then choose the work-flow’s parameter file ‘Tutorial_Parameter_file.yaml’ and click open.

Run the Work-Flow

https://raw.githubusercontent.com/bioinfo-core-BGU/NeatSeq-Flow-Using-Docker/master/doc/Generate_scripts.gif

If NeatSeq-Flow is installed Locally: Choose the neatseq_flow.py script location.

In order to Generate the Work-Flow scripts:

  1. Select the Sample file.
  2. Select the Work-Flow parameter-file.
  3. Choose the Project Directory to generate the Work-Flow’s scripts in (the default is to use the Current Working Directory )
  4. Click on the ‘Generate scripts’ button.

To run the Work-Flow click on the ‘Run scripts’ button

https://raw.githubusercontent.com/bioinfo-core-BGU/NeatSeq-Flow-Using-Docker/master/doc/Run_scripts.gif

**It is possible to monitor the Work-Flow progress by clicking the ‘Run Monitor’ button

https://raw.githubusercontent.com/bioinfo-core-BGU/NeatSeq-Flow-Using-Docker/master/doc/Run_Monitor.gif

Note

It is possible to terminate the current run by clicking on the ‘Kill Run’ button.

Configure a Sample file

In the ‘Samples’ Tab:

  1. Edit The Project Title Name:

    • You can edit the project title name by clicking on the Project Title name.
  2. Add a Sample/Project File:

    • You can add a sample/project file by clicking the ‘Add Sample File’ or ‘Add project File’ button and choose a file/s.
  3. Load a Sample file:

    https://raw.githubusercontent.com/bioinfo-core-BGU/NeatSeq-Flow-GUI/master/doc/Load_Sample_file.gif
    • Click on the ‘Load Sample File’ button, then choose the work-flow’s sample file ‘Tutorial_Samples_file.nsfs’ and click open.
    • You can edit the names of the samples by clicking on the sample name.
    • You can remove a sample/project file by clicking the ‘Remove’ button.
    • You can change a sample/project file type by clicking the drop-down menu or by editing the type name.

Configure the Cluster information

  1. Edit Field:

    In the ‘Cluster’ Tab choose a field name to edit, change the key or value and then click on the ‘Edit’ button.

  2. Create New Field:

    • You can create new field by clicking on some existing field name and then click the ‘New Field’ button.
    • You can create new sub field by clicking on the existing field to which you want to create a sub field and then click the ‘New Sub Field’ button.

Learn How to Create a Work-Flow

  1. Add New Step:

    https://raw.githubusercontent.com/bioinfo-core-BGU/NeatSeq-Flow-GUI/master/doc/Add_Step.gif

    In the ‘Work-Flow’ Tab choose a module template and click on the ‘Create New Step’ button.

  2. Change Step Name:

    https://raw.githubusercontent.com/bioinfo-core-BGU/NeatSeq-Flow-GUI/master/doc/Change_Step_Name.gif

    You can change the new step name by clicking on the step name and edit the key field and then click the ‘Edit’ button to set the change.

  3. To determine the position of the new step in the work-flow:

    https://raw.githubusercontent.com/bioinfo-core-BGU/NeatSeq-Flow-GUI/master/doc/Set_base.gif
    • Click on the step button to see the step options
    • Click on the base option
    • Click on the ‘Value options’ drop-down menu
    • Choose a previous step and click the ‘Add’ button. This can be repeated to choose several previous steps.
    • Click the ‘Edit’ button to set the changes.
  4. Add new step option:

    https://raw.githubusercontent.com/bioinfo-core-BGU/NeatSeq-Flow-GUI/master/doc/New_step_option.gif
    • Click on the step’s name (or a step option to create a new sub option)
    • Click on the ‘New’ button.
    • It is possible to edit the new option name and value by editing the ‘Key’ field and the ‘Value’ field, it is also possible to choose from the ‘Value options’ drop-down menu.
    • Click the ‘Edit’ button to set the changes.
  5. Edit step’s options:

    https://raw.githubusercontent.com/bioinfo-core-BGU/NeatSeq-Flow-GUI/master/doc/Edit_step_option.gif
    • Click on the step’s option name and change the ‘Key’ field and/or the ‘Value’ field, it is also possible to choose from the ‘Value options’ drop-down menu.
    • When using the ‘Value options’ drop-down menu, in some cases it is possible to choose variables that are defined in the ‘Vars’ Tab. They will appear in the form of {Vars.some_field.some_sub_field} to indicate the value found in the ‘Vars’ Tab in the some_sub_field field ( which is a sub field of ‘some_field’ ).
    • It is possible to choose file location as a value to the ‘Value’ field by clicking on the ‘Browse’ button.
    • Click the ‘Edit’ button to set the changes.
  6. Duplicate field or step:

    https://raw.githubusercontent.com/bioinfo-core-BGU/NeatSeq-Flow-GUI/master/doc/Duplicate_field_or_step.gif
    • Click on the step’s name (to duplicate the step) or on a step’s option name (to duplicate the option and it’s sub fields)
    • Click the ‘Duplicate’ button
  7. Remove field or step:

    https://raw.githubusercontent.com/bioinfo-core-BGU/NeatSeq-Flow-GUI/master/doc/Remove_field_or_step.gif
    • Click on the step’s name (to remove the step) or on a step’s option name (to remove the option and it’s sub fields)
    • Click the ‘Remove’ button

Configure the Used Variables in the Work-Flow

  1. Edit Variables:

    https://raw.githubusercontent.com/bioinfo-core-BGU/NeatSeq-Flow-GUI/master/doc/Edit_Var.gif

    In the ‘Vars’ Tab choose a variable name to edit, change the key or value and then click on the ‘Edit’ button.

  2. Create New Variable:

    https://raw.githubusercontent.com/bioinfo-core-BGU/NeatSeq-Flow-GUI/master/doc/Create_New_variable.gif
    • You can create new variable by clicking on some existing variable name and then click the ‘New Field’ button.
    • You can create new sub variable by clicking on the existing variable to which you want to create a sub variable and then click the ‘New Sub Field’ button.

Learn how to use the Command Line Interface

To Run the Tutorial Work-Flow in a command line Interface:

  1. Activate the NeatSeq_Flow conda environment:

    bash
    source activate NeatSeq_Flow
    
  2. Generate the scripts by typing in the command line:

    neatseq_flow.py -s Tutorial_Samples_file.nsfs -p Tutorial_Parameter_file.yaml
    

Note

  • It is possible to indicate the Project Directory to generate the Work-Flow’s scripts in using the -d option (the default is to use the Current Working Directory )

  • It is possible to see all NeatSeq-Flow’s options by typing:

    neatseq_flow.py -h
    
  1. Run the Work-Flow by typing in the command line:

    bash  scripts/00.workflow.commands.sh  1> null &
    
  2. Run the Work-Flow monitor by typing in the command line:

    neatseq_flow_monitor.py
    

Note

  • It is possible to terminate the current run by typing:

    bash scripts/99.kill_all.sh
    

Contact

Please contact Liron Levin at: levinl@post.bgu.ac.il