ChIP-seq workflow
| Author: | Menachem Sklarz |
|---|---|
| Affiliation: | Bioinformatics Core Facility |
| Organization: | National Institute of Biotechnology in the Negev, Ben Gurion University. |
Module categories
This workflow automates a standard ChIP-seq analysis.
Note
This workflow is based on a workflow kindly provided by Dr. Dena Leshkowitz of the Life Sciences Core Facilities, Weizmann Institute of Science.
Warning
The ChIP-seq workflow is in active development.
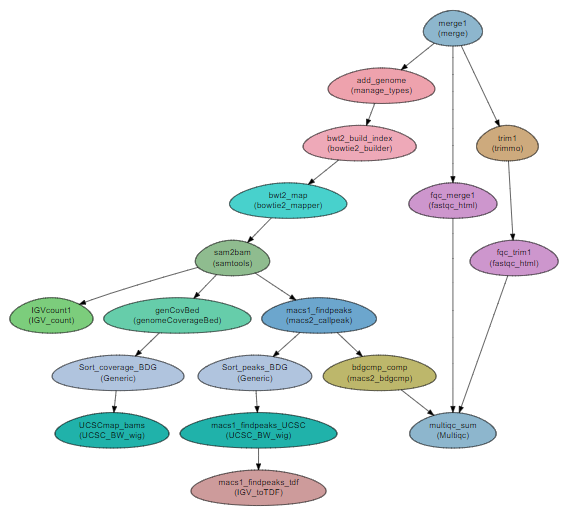
Steps:
- Preparation and QA:
a. Merging the reads into a single file per sample (
merge). b. QC with fastqc (fastqc_html) c. Trimming with trimmomatic (trimmo) d. QC on trimmed reads with fastqc e. Adding the genome and the GTF file to the project (manage_types). - Mapping
a. Creating a bowtie2 index for the genome (
bowtie2_builder) a. Mapping the reads to the reference genome with bowtie2 (bowtie2_mapper) b. Conversion to sorted BAM with samtools (samtools) c. Sorting by name for bedGraphToBigWig with theGenericmodule. c. Converting to UCSC and IGV format (genomeCoverageBed,UCSC_BW_wigandIGV_count) - Finding ChIP peaks
a. Peak calling is performed with macs2 callpeak (
macs2_callpeak) b. Further analysis of the peaks is done with macs2 bdgcmp (macs2_bdgcmp)
Attention
In this workflow, we added the genome and GTF file via the parameter file. It is possible to add them via the sample file, as well.
Requires
- fastq files, either paired-end or single-end.
- A sample to control mapping (see Example sample lines below)
Programs required
Tip
All programs can be installed with CODDA. See section Quick start with conda
Example of Sample File
Title       ChIP_project

#SampleID   Type    Path    lane
Sample1     Forward /path/to/Sample1_F1.fastq.gz 1
Sample1     Forward /path/to/Sample1_F2.fastq.gz 2
Sample1     Reverse /path/to/Sample1_R1.fastq.gz 1
Sample1     Reverse /path/to/Sample1_R2.fastq.gz 2
Sample2     Forward /path/to/Sample2_F1.fastq.gz 1
Sample2     Reverse /path/to/Sample2_R1.fastq.gz 1
Sample2     Forward /path/to/Sample2_F2.fastq.gz 2
Sample2     Reverse /path/to/Sample2_R2.fastq.gz 2

Sample_Control   Sample1:Sample2
Quick start with conda
For easy setup of the workflow with CONDA, use the following instructions:
Create and activate a conda environment with all the required programs:
curl -LO https://raw.githubusercontent.com/bioinfo-core-BGU/neatseq-flow-modules/master/docs/source/Workflow_docs/ChIP_seq_conda.yaml
conda env create -n ChIP_seq_WF -f ChIP_seq_conda.yaml
source activate ChIP_seq_WF
Create a sample file. It should look like the file shown in Example of Sample File. Don’t forget to replace the sample names and file paths:
Warning
Make sure the file is TAB-delimited!
Tip
To get the full path to a file, use the following command:
readlink -f <filename>
Get the parameter file with:
curl -LO https://raw.githubusercontent.com/bioinfo-core-BGU/neatseq-flow-modules/master/Workflows/ChIP_seq.yaml
Run the workflow:
- Activate the NeatSeq-Flow conda environment. (See Installing NeatSeq-Flow)
- Execute the script generator and run the workflow. (See Running NeatSeq-Flow.)