Microbe-Flow: a comprehensive workflow for bacterial genomics, pathogenomics and genomic epidemiology
A specialized workflow for bacterial genomics, pathogenomics and genomic epidemiology.
- Author
Liron Levin
- Affiliation
Bioinformatics Core Facility
- Organization
National Institute of Biotechnology in the Negev, Ben Gurion University.
Table of Contents
Short Description:
Microbe-Flow is an easy to setup, modular and flexible workflow for analyzing bacterial whole genome sequencing (WGS) data. It is based on the NeatSeq-Flow platform for modular workflow design and efficient execution on computer clusters. Microbe-Flow uses a wide range of tools to enable a comprehensive overview on large numbers of samples. Microbe-Flow offers an automated solution for WGS, starting from FASTQ files, including raw reads quality control (QC), de novo assembly and its QC, gene prediction and annotation including virulence/resistance genes, phylogenetic analyses and typing based on variant calling and core SNPs, multilocus sequence typing (MLST) and core genome (cg)MLST. Notably, Microbe-Flow enables a range of studies including pan-genome and association analysis for desired bacterial attributes, bi-clustering of virulence genes including enrichment and gene cluster co-localization tests. Conveniently, Microbe-Flow is not species-specific and can be adjusted to any bacterium, while species-specific steps can be added as needed. It also produces a final report. Microbe-Flow was designed to work hand in hand with CONDA environments to enable an easy installation of almost all the pre-required programs and packages. Finally, Microbe-Flow is well documented and has step by step walk through instructions.
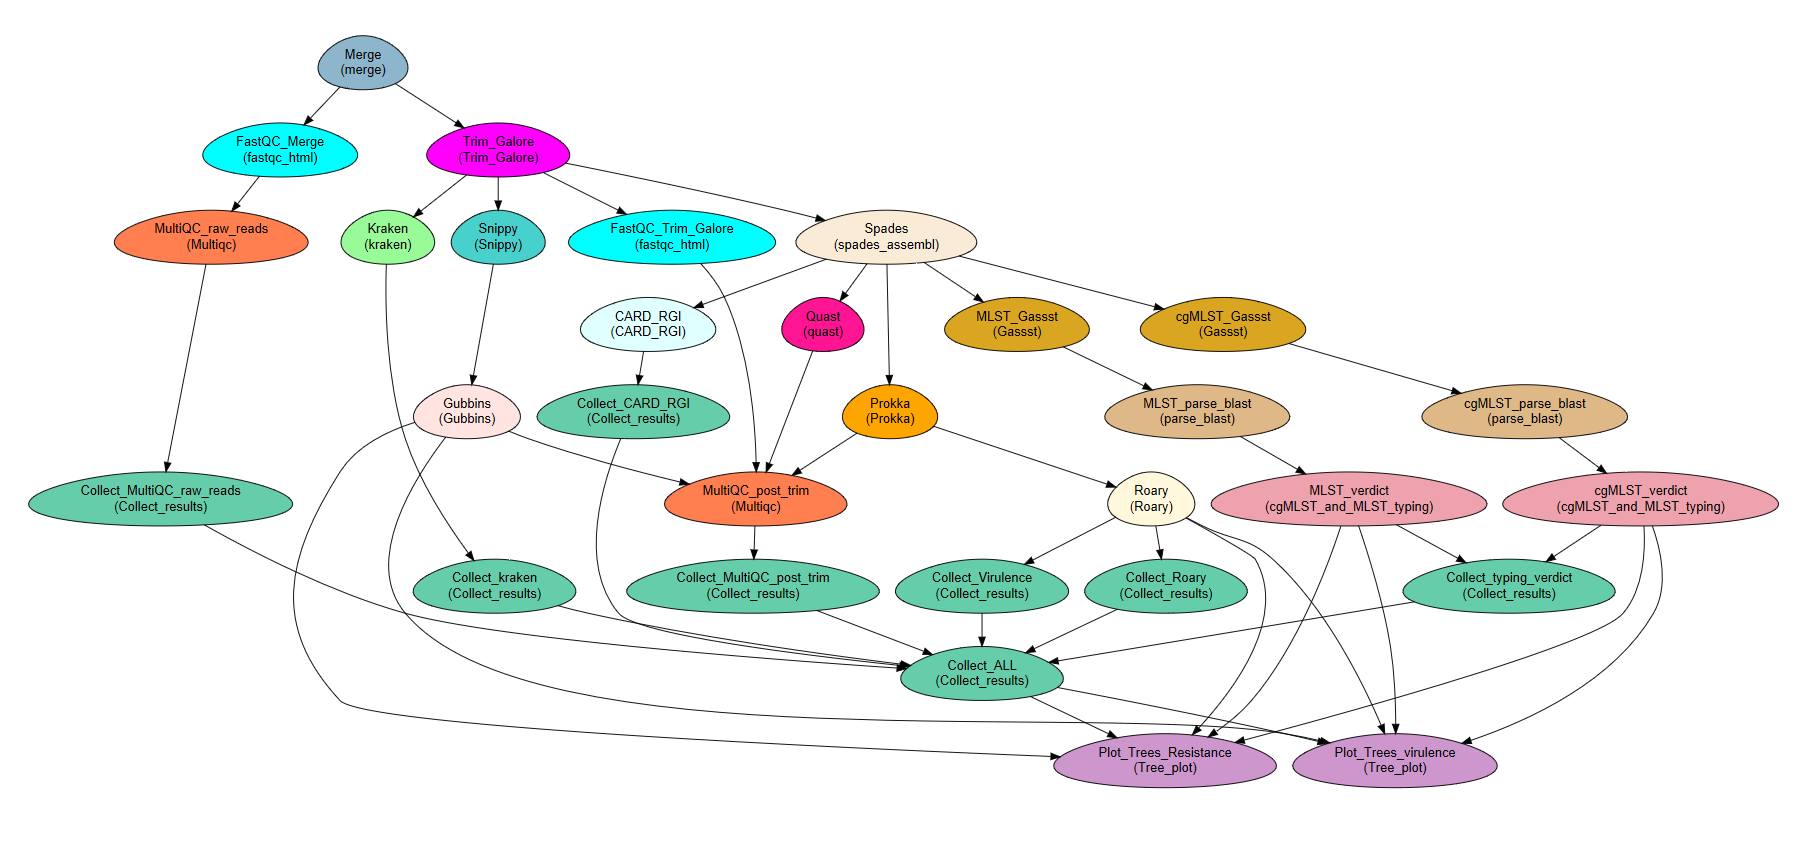
- The Microbe-Flow Workflow performs the following tasks:
Quality testing and trimming of raw reads (paired or single end) using Trim Galore 1 and Cutadapt 2.
Contamination check using Kraken 3.
De novo assembly using SPAdes 4
De novo assembly QC using QUAST 5
Graphical QC reports (post and pre trimming) using MultiQC 6
Gene prediction and annotation including the identification of virulence genes from the VFDB database, using Prokka 7 and detection of resistance genes using CARD RGI 8.
Variant calling and generation of a core SNP set using Snippy 9 and prediction of recombination regions by Gubbins 10
Multi-locus sequence typing (MLST) and core genome (cg) MLST using GASSST global alignment search tool 11 and in house scripts, including detection of new alleles.
Pan-genome analysis using Roary 12,including generation of a genes X genomes presence/absence matrix and association analysis based on the pan-genome using scoary 13.
Bi-clustering analysis of virulence genes, to identify groups of genes that are shared by subsets of the genomes using the eisa R package 14 and in-house scripts..
Enrichment analysis of gene groups and genome subsets, identified by the bi-clustering analysis using the clusterProfiler R package 15 and in house scripts.
Co-localization analysis of gene clusters identified in the bi-clustering analysis using Gecko3 16.
Generation of output files ready to use in phyloviz 17.
Generation of multiple layers’ phylogenetic trees plots using ggtree R package 18 and in-house scripts.
Generation of a final report that includes: Sample’s MetaData, reads QC, Kraken results, de novo assembly QC, pan-genome analysis matrix, resistance genes results and MLST typing
Advantages for using Microbe-Flow:
While using Microbe-flow the user has full control over the execution of the workflow. Moreover, the workflow is not a ‘black box’. It is transparent, and all the underlying commands are available to the user. The workflow can be efficiently executed on computer clusters by parallelizing on both samples and workflow steps. The workflow is highly reproducible and the same analysis can be repeated at any time in the future. The user is relieved from the need to know or manage the location of the workflow’s intermediate or final files. Nevertheless, the results of all workflow steps are neatly organized in designated folders for easy navigation. The workflow is flexible and steps can be easily added or removed. The user can monitor the progress of the workflow and observe execution(s) errors in real time.
Note
Microbe-Flow was developed as part of a study led by Prof. Jacob Moran-Gilad.
Tip
This Workflow has lots of dependencies [Programs and R/Python Packages] therefore it is highly recommended to use CONDA for instant installation of the entire environment. See The Using CONDA environment section.
A schematic description of Microbe-flow
Requirements
Files required
For the MLST/cgMLST Typing:
Tip
See Get Scheme
Programs required
fastqc*
Trim-Galore*
cutadapt*
Kraken*
Snippy*
Spades*
Quast*
rgi*
Prokka*
Roary*
multiqc*
scoary*
Gubbins*
Gassst(Download Gassst)
Gecko3(Download Gecko3)
Packages required
- Python2.7:
pyyaml*pandas*bunch*patsy*seaborn*matplotlib*numpy*scipy*openpyxl*
- R:
htmlwidgets*diagrammer*XML*magrittr*plyr*optparse*openxlsx*dplyr*ape*ggtree[bioconductor] *clusterprofiler[bioconductor] *hgu95av2.db[bioconductor] **ExpressionView[bioconductor] **eisa[bioconductor] **
Attention
These Programs/Packages are the main Programs/Packages used in this Workflow However, they might have their own dependencies
Note
The Programs/Packages marked by * will be installed automatically [with all their dependencies] when using CONDA environment.
The R packages marked by ** are not available through CONDA, however, when using CONDA environment they will be installed to the CONDA environment on the first run of the relevant R scripts.
The Gubbins program needs a different version of python (v3.6) therefore needs to run in different CONDA environment.
See The Using CONDA environment section
Requirements Table
Step |
Module |
Programs |
Python packages |
R packages |
|---|---|---|---|---|
Merge |
Merge |
pyyaml, bunch |
||
FastQC_Merge |
fastqc_html |
fastqc |
||
Trim_Galore |
Trim_Galore |
Trim-Galore, cutadapt |
||
FastQC_Trim_Galore |
fastqc_html |
fastqc |
||
Kraken |
kraken |
Kraken |
||
Collect_kraken |
Collect_results |
pandas, openpyxl |
||
Snippy |
Snippy |
Snippy |
pandas |
|
Gubbins |
Gubbins |
Gubbins |
python3.6,pandas |
|
Spades |
spades_assembl |
Spades |
||
Quast |
quast |
Quast |
||
Prokka |
Prokka |
Prokka |
||
CARD_RGI |
CARD_RGI |
rgi |
||
Collect_CARD_RGI |
Collect_results |
pandas, openpyxl |
||
Roary |
Roary |
Roary, scoary [optional], Gecko3 [optional] |
pandas, patsy, seaborn, matplotlib, numpy, scipy |
optparse, eisa, ExpressionView, openxlsx, clusterProfiler, org.Hs.eg.db |
Collect_Roary |
Collect_results |
pandas, openpyxl |
||
Collect_Virulence |
Collect_results |
pandas, openpyxl |
||
MLST_Gassst |
Gassst |
Gassst |
pandas |
|
MLST_parse_blast |
parse_blast |
parse_blast.R [From NeatSeq-Flow] |
magrittr, plyr, optparse |
|
MLST_verdict |
cgMLST_and_MLST_typing |
pandas |
magrittr, plyr, optparse |
|
cgMLST_Gassst |
Gassst |
Gassst |
pandas |
|
cgMLST_parse_blast |
parse_blast |
parse_blast.R [From NeatSeq-Flow] |
magrittr, plyr, optparse |
|
cgMLST_verdict |
cgMLST_and_MLST_typing |
pandas |
magrittr, plyr, optparse |
|
Collect_typing_verdict |
Collect_results |
pandas, openpyxl |
||
MultiQC_raw_reads |
Multiqc |
multiqc |
||
MultiQC_post_trim |
Multiqc |
multiqc |
||
Collect_MultiQC_post_trim |
Collect_results |
pandas, openpyxl |
||
Collect_MultiQC_raw_reads |
Collect_results |
pandas, openpyxl |
||
Collect_ALL |
Collect_results |
pandas, openpyxl |
||
Plot_Trees_Resistance |
Tree_plot |
ggtree, optparse, openxlsx, ape |
||
Plot_Trees_virulence |
Tree_plot |
ggtree, optparse, openxlsx, ape |
Examples of Required Files
Samples File [Tab delimited]
Title       Microbe-Flow

#SampleID     Type                    Path
Sample1       Forward         Sample1F.fastq
Sample1       Reverse         Sample1R.fastq
Sample2       Forward         Sample2F.fastq
Sample2       Reverse         Sample2R.fastq
Sample3       Forward         Sample3F.fastq
Sample3       Reverse         Sample3R.fastq
Sample’s Meta-Data file [Tab delimited]
Samples     SourceType      GeographicLocation
Sample1     Nose            USA
Sample2     Nose            CANADA
Sample3     Blood           UK
MLST/cgMLST Typing FASTA File
>arcC_1
TTATTAATCCAACAAGCTAAATCGAACAGTGACACAACGCCGGCAATGCCATTGGATACT
TGTGGTGCAATGTCACAGGGTATGATAGGCTATTGGTTGGAAACTGAAATCAATCGCATT
>arcC_2
TTATTAATCCAACAAGCTAAATCGAACAGTGACACAACGCCGGCAATGCCATTGGATACT
TGTGGTGCAATGTCACAAGGTATGATAGGCTATTGGTTGGAAACTGAAATCAATCGCATT
TTAACTGAAATGAATAGTGATAGAACTGTAGGCACAATCGTAACACGTGTGGAAGTAGAT
>arcC_3
TTATTAATCCAACAAGCTAAATCGAACAGTGACACAACGCCGGCAATGCCATTGGATACT
TGTGGTGCAATGTCACAGGGTATGATAGGCTATTGGTTGGAAACTGAAATCAATCGCATT
MLST/cgMLST Typing Alleles Map File [Tab delimited]
Allele      Gene    Number
arcC_1      arcC    1
arcC_2      arcC    2
arcC_3      arcC    3
MLST/cgMLST Typing Scheme File [Tab delimited]
ST      arcC    aroE    glpF    gmk     pta     tpi     yqiL
1       1       1       1       1       1       1       1
2       2       2       2       2       2       2       26
3       1       1       1       9       1       1       12
4       10      10      8       6       10      3       2
5       1       4       1       4       12      1       10
Tip
You can use a shell script to download the Typing Required Files from PubMLST
In the command line type:
wget https://raw.githubusercontent.com/bioinfo-core-BGU/neatseq-flow-modules/master/Workflows/Microbe-Flow/get_scheme.shFor example: in order to download the MLST Required Files of Campylobacter jejuni
In the command line type:
sh get_scheme.sh "Campylobacter jejuni" "MLST"
Go to PubMLST to make sure the correct scheme was downloaded!!!!
Install and Run Microbe-Flow
- There are two ways to install and run the Microbe-Flow workflow:
For users that needs to install all/most of the required programs/packages it is recommended to Install using CONDA
Users that already have the required programs/packages installed on their system can use a local copy of NeatSeq-Flow
To perform a test run on a publicly available data jump to the Perform a test run section
Using CONDA environment
The easiest way to run Microbe-Flow is through CONDA virtual environment. For that you will need:
Conda installed on your system (very easy installation of miniconda).
The Microbe-Flow CONDA installer file[including NeatSeq-Flow]
1. Create NeatSeq-Flow project directory
In the command line type:
mkdir Microbe-Flow
cd Microbe-Flow
2. Install NeatSeq-Flow
Install NeatSeq-Flow using CONDA
In the command line type:
wget https://raw.githubusercontent.com/bioinfo-core-BGU/NeatSeq-Flow-GUI/master/NeatSeq_Flow_GUI_installer.yaml
conda env create -f NeatSeq_Flow_GUI_installer.yaml
3. Install the Microbe-Flow environment
This installation includes NeatSeq-Flow, it’s modules and most of the required programs and packages
Note
Some R packages are not available through CONDA, however, they will be installed to the CONDA environment on the first run of the relevant R scripts
Attention
This installation will take a while [several hours]!!
In the command line type:
conda config --add channels conda-forge
conda config --add channels bioconda
wget https://raw.githubusercontent.com/bioinfo-core-BGU/neatseq-flow-modules/master/docs/source/_extra/Microbe-Flow/Microbe-Flow_conda_env_install.yaml

conda env create -f  Microbe-Flow_conda_env_install.yaml
wget https://raw.githubusercontent.com/bioinfo-core-BGU/neatseq-flow-modules/master/docs/source/_extra/Microbe-Flow/Microbe-Flow_GUBBINS_conda_env_install.yaml
conda env create -f  Microbe-Flow_GUBBINS_conda_env_install.yaml
4. Activate the NeatSeq-Flow environment
Attention
From the following step onwards, you should be in ``bash`` shell
In the command line type:
bashIn the command line type:
source activate NeatSeq_Flow
export CONDA_BASE=$(conda info --root)
Note
To perform a test run on a publicly available data jump to the Perform a test run section
5. Create a Samples file for your project
In the command line type:
nano Samples.nsfsNote
Define your samples and their file locations and Don’t forget to save the file when you’re done!
Tip
You can do the editing with any text editor of your liking (e.g. Notepad++, not Microsoft Word). However:
The file needs to be in unix End Of Line (EOL) format.
Don’t forget to copy it to the project directory.
6. Edit the Microbe-Flow parameter file to suit your cluster
In the command line type:
wget https://raw.githubusercontent.com/bioinfo-core-BGU/neatseq-flow-modules/master/Workflows/Microbe-Flow/Microbe-Flow_conda.yaml
nano  Microbe-Flow_conda.yaml
Tip
You can do the editting with any text editor of your liking. However:
The file needs to be in unix End Of Line (EOL) format.
Don’t forget to copy it to the project directory.
Attention
Edit the global params section [Especially the lines marked by <<]:
Global_params:
    Executor: Local # Change to your Executor SGE/SLURM/Local
    Qsub_opts: -cwd
    Qsub_path: /PATH_TO_YOUR_QSUB/ <<
    Qsub_q: your.q <<
    Default_wait: 10
Tip
The
Qsub_pathparameter can be determined by executing the following command:dirname `which qsub`and replacing /PATH_TO_YOUR_QSUB/ with the result.
Attention
Edit the Vars section [Especially the lines marked by <<]:
Vars:
    # For running using conda environments:
    conda:
        base: # Can be empty if running from conda environment
        env: Microbe-Flow
    # Set your Parallel Environment :
    Parallel_Environment:
        # Run 'qconf -spl' to view all the Parallel Environments [pe_name] available to you
        pe_name: <<
        # Set for each program the number/range of slots[cpus] to request per sample/project
        FastQC: '1' <<
        Snippy: '1' <<
        Spades: '1' <<
        Kraken: '1' <<
        Quast: '1' <<
        CARD_RGI: '1' <<
        Prokka: '1' <<
        Roary: '1' <<
        Gassst: '1' <<
    # If conda environment is not used, give the full path to the following programs:
    Programs_path:
        Trim_Galore:
            Main: trim_galore
            cutadapt: cutadapt
        FastQC: fastqc
        Kraken: kraken
        Snippy:
            Main: snippy
            snippy_core: snippy-core
        Gubbins:
            # If you choose NOT to run gubbins write in the next line: script_path: ''
            script_path: run_gubbins.py
            conda:
                base: # Can be empty if running from conda environment
                # If you choose NOT to run gubbins write in the next line: env: Microbe-Flow
                env:  gubbins
        Spades: spades.py
        Quast: quast
        CARD_RGI:
            Main: rgi
            JSON2tsv_script: rgi_jsontab
        Prokka: prokka
        Roary:
            Main: roary
            scoary: scoary
            Gecko3: /PATH_TO_GECKO3/ <<
        Gassst: /PATH_TO_GASSST/ <<
        parse_blast: parse_blast.R
        Multiqc: multiqc
    Genome:
        reference: /PATH_TO_REFERENCE_GENOME_IN_FASTA_or_GENBANK_FORMAT/ <<
        genus: '"YOUR_GENUS"' <<
        kingdom: '"Bacteria"' <<
    MetaData:
        File: /PATH_TO_YOUR_METADATA_FILE/ <<
        # THE COLUMN NAME IN THE METADATA FILE OF THE SAMPLES IDs
        Sample_ID_column_name: Samples <<
    Typing:
        MLST:
            FASTA: /PATH_TO_YOUR_MLST_FASTA_FILE/ <<
            scheme: /PATH_TO_YOUR_MLST_SCHEME_FILE/ <<
            Allele: /PATH_TO_YOUR_MLST_ALLELE_MAP_FILE/ <<
            # EDIT/ADD COLUMN IN THE SCHEME FILE THAT ARE NOT LOCUS NAMES (COMMA DELIMITED)
            Type_col_name: "ST,clonal_complex" <<
        cgMLST:
            FASTA: /PATH_TO_YOUR_cgMLST_FASTA_FILE/ <<
            scheme: /PATH_TO_YOUR_cgMLST_SCHEME_FILE/ <<
            Allele: /PATH_TO_YOUR_cgMLST_ALLELE_MAP_FILE/ <<
            # EDIT/ADD COLUMN IN THE SCHEME FILE THAT ARE NOT LOCUS NAMES (COMMA DELIMITED)
            Type_col_name: "cgST" <<
    Database:
        kraken: /PATH_TO_KRAKEN_DATA_BASE/ <<
    Additional:
        Roary:
            Bi_cluster:
                # EDIT/ADD COLUMN IN THE META DATA FILE TO BE ADDED TO THE BI-CLUSTERING RESULTS
                cols_to_use: '"SourceType","GeographicLocation"' <<
            scoary:
                # a list of conditions to create the scoary traits file from MetaData file.
                # Pairs of field and operator + value to convert to boolean traits: field_name1/op_value1
                # Example: "field_1/>=val_1<val_2"    "feild_2/=='str_val'"
                # A Filter can be used by FILTER_field_name1/FILTER_op_value1&field_name1/op_value1
                traits_to_pars: '"SourceType/==''Nose''" "SourceType/==''Blood''"' <<
Note
You need to specify a Parallel Environment Name [pe_name] !!!
You can type in the command line:
qconf -splTo view all PEs [pe_name] available to you.
Tip
If you don’t have a Kraken database you can create one using this command:
mkdir Kraken_db
kraken-build  --standard --db Kraken_db
- Then edit the following line:
kraken: /PATH_TO_KRAKEN_DATA_BASE/
- To say:
kraken: Kraken_db
Tip
You can skip a workflow step by adding a
SKIP:line at the step definition in the parameter file.For example to skip the kraken step:
Kraken:
    SKIP:
    module: kraken
    base: Trim_Galore
    script_path: {Vars.Programs_path.Kraken}
    qsub_params:
        -pe: '{Vars.Parallel_Environment.pe_name} {Vars.Parallel_Environment.Kraken}'
    redirects:
        --db: {Vars.Database.kraken}
        --preload: null
        --quick: null
        --threads: {Vars.Parallel_Environment.Kraken}
Note
Don’t forget to save the file when you’re done!
7. Run NeatSeq-Flow
In the command line type:
source activate NeatSeq_Flow

neatseq_flow.py                                                      \
--sample_file Samples.nsfs                                           \
--param_file  Microbe-Flow_conda.yaml  \
--message     "an informative message"
Note
If NeatSeq-Flow says :
Finished successfully....it is OK to move on.
8. Run Microbe-Flow
In the command line type:
sh scripts/00.workflow.commands.sh
9. Run the NeatSeq-Flow monitor
In the command line type:
neatseq_flow_monitor.py
Note
If you executed NeatSeq-Flow several times before running the workflow, you will have to select the correct log file in the upper window of the monitor. The log file is identified by the run code, which is composed of the date and time of NeatSeq-Flow execution.
Tip
The NeatSeq-Flow monitor is color-coded and for each step or sample:
- Green: indicate that No problems were detected.
- Red: indicate that Problems were detected[Step/sample finished with Errors or did not finished at all]
- Yellow: indicate that The step/sample is in progress
10. Checking the Workflow output
Browse the
data/directory for the outputs from the programs executed by Microbe-Flow.You can also check out the log files, the standard output and error files in the
logs/,stdout/andstderr/directories, respectively. It is especially informative when problems were identified in the The NeatSeq-Flow monitor
11. Deactivate Microbe-Flow environment
Deactivate the Microbe-Flow environment if you want to go back to you’re regular system settings.
Note
Deactivation of the Microbe-Flow environment will not delete the environment [and its programs] it will only be inaccessible until the next time you activate it. In order to Un-install the environment [and delete all programs] See Un-install the environment
In the command line type:
source deactivate
11. Un-install the Microbe-Flow environment
Warning
Since installing Microbe-Flow environment takes time, un-install it only if you are not going to use it in the future.
conda remove --name  Microbe-Flow --all
conda remove --name  gubbins --all
Using a local copy of NeatSeq-Flow
If you have all the required programs installed on your system you can download and run NeatSeq-Flow without installation.
For that you will need:
Python 2.7 installed
The python dependencies: yaml and bunch (you can install them by using
pip install yaml bunchin the command line).All the required programs for this workflow installed on your system.
Attention
The Programs/Packages used in Microbe-Flow might have their own dependencies Make sure they are all satisfied
1. Create NeatSeq-Flow project directory
In the command line type:
mkdir Microbe-Flow
cd Microbe-Flow
2. Download the NeatSeq-Flow repositories from github
In the command line type:
mkdir NeatSeq-Flow
cd NeatSeq-Flow
git clone https://github.com/bioinfo-core-BGU/neatseq-flow.git
git clone https://github.com/bioinfo-core-BGU/neatseq-flow-modules.git
git clone https://github.com/bioinfo-core-BGU/parse_blast.git
cd ..
3. Create a Samples file for your project
In the command line type:
nano Samples.nsfsNote
Define your samples and their file locations and Don’t forget to save the file when you’re done!
Tip
You can do the editing with any text editor of your liking. However:
The file needs to be in unix End Of Line (EOL) format.
Don’t forget to copy it to the project directory.
4. Edit the Microbe-Flow parameter file to suit your cluster
In the command line type:
wget https://raw.githubusercontent.com/bioinfo-core-BGU/neatseq-flow-modules/master/Workflows/Microbe-Flow/Microbe-Flow.yaml

nano  Microbe-Flow.yaml
Attention
Edit the global params section [Especially the lines marked by <<]:
Global_params:
    Qsub_opts: -cwd
    Qsub_path: /PATH_TO_YOUR_QSUB/ <<
    Qsub_q: your.q <<
    Default_wait: 10
    module_path: /PATH_TO_NEATSEQ-FLOW_MODULES/ <<
Tip
The
Qsub_pathparameter can be determined by executing the following command:dirname `which qsub`and replacing /PATH_TO_YOUR_QSUB/ with the result.
Tip
The
module_pathparameter can be determined by executing the following command:echo $cwd/NeatSeq-Flow/neatseq-flow-modules/neatseq_flow_modules/and replacing /PATH_TO_NEATSEQ-FLOW_MODULES/ with the result.
Attention
Edit the Vars section [Especially the lines marked by <<]:
Vars:
    # Set your Parallel Environment :
    Parallel_Environment:
        # Run 'qconf –spl' to view all the Parallel Environments [pe_name] available to you
        pe_name: <<
        # Set for each program the number/range of slots[cpus] to request per sample/project
        FastQC: '1' <<
        Snippy: '1' <<
        Spades: '1' <<
        Kraken: '1' <<
        Quast: '1' <<
        CARD_RGI: '1' <<
        Prokka: '1' <<
        Roary: '1' <<
        Gassst: '1' <<
    # If conda environment is not used, give the full path to the following programs:
    Programs_path:
        Trim_Galore:
            Main: /PATH_TO/trim_galore <<
            cutadapt: /PATH_TO/cutadapt <<
        FastQC: /PATH_TO/fastqc <<
        Kraken: /PATH_TO/kraken <<
        Snippy:
            Main: /PATH_TO/snippy <<
            snippy_core: /PATH_TO/snippy-core <<
        Gubbins:
            # If you choose NOT to run gubbins write in the next line: script_path: ''
            script_path: python /PATH_TO/run_gubbins.py <<
        Spades: python /PATH_TO/spades.py <<
        Quast: /PATH_TO/quast <<
        CARD_RGI:
            Main: /PATH_TO/rgi <<
            JSON2tsv_script: /PATH_TO/rgi_jsontab <<
        Prokka: /PATH_TO/prokka <<
        Roary:
            Main: /PATH_TO/roary <<
            scoary: /PATH_TO/scoary <<
            Gecko3: /PATH_TO_GECKO3/ <<
        Gassst: /PATH_TO_GASSST/ <<
        parse_blast: /PATH_TO/parse_blast.R <<
        Multiqc: /PATH_TO/multiqc <<
    Genome:
        reference: /PATH_TO_REFERENCE_GENOME_IN_GENEBANK_FORMAT/ <<
        genus: '"YOUR_GENUS"' <<
        kingdom: '"Bacteria"' <<
    MetaData:
        File: /PATH_TO_YOUR_METADATA_FILE/ <<
        # THE COLUMN NAME IN THE METADATA FILE OF THE SAMPLES IDs
        Sample_ID_column_name: Samples <<
    Typing:
        MLST:
            FASTA: /PATH_TO_YOUR_MLST_FASTA_FILE/ <<
            scheme: /PATH_TO_YOUR_MLST_SCHEME_FILE/ <<
            Allele: /PATH_TO_YOUR_MLST_ALLELE_MAP_FILE/ <<
            # EDIT/ADD COLUMN IN THE SCHEME FILE THAT ARE NOT LOCUS NAMES (COMMA DELIMITED)
            Type_col_name: "ST"<<
        cgMLST:
            FASTA: /PATH_TO_YOUR_cgMLST_FASTA_FILE/ <<
            scheme: /PATH_TO_YOUR_cgMLST_SCHEME_FILE/ <<
            Allele: /PATH_TO_YOUR_cgMLST_ALLELE_MAP_FILE/ <<
            # EDIT/ADD COLUMN IN THE SCHEME FILE THAT ARE NOT LOCUS NAMES (COMMA DELIMITED)
            Type_col_name: "cgST" <<
    Database:
        kraken: /PATH_TO_KRAKEN_DATA_BASE/ <<
    Additional:
        Roary:
            Bi_cluster:
                # EDIT/ADD COLUMN IN THE META DATA FILE TO BE ADDED TO THE BI-CLUSTERING RESULTS
                cols_to_use: '"SourceType","GeographicLocation"' <<
            scoary:
                # a list of conditions to create the scoary traits file from MetaData file.
                # Pairs of field and operator + value to convert to boolean traits: field_name1/op_value1
                # Example: "field_1/>=val_1<val_2"    "feild_2/=='str_val'"
                # A Filter can be used by FILTER_field_name1/FILTER_op_value1&field_name1/op_value1
                traits_to_pars: '"SourceType/==''Nose''" "SourceType/==''Blood''"' <<
Note
You need to specify a Parallel Environment Name [pe_name] !!!
You can type in the command line:
qconf –splTo view all PEs [pe_name] available to you.
Tip
The
parse_blastparameter can be determined by executing the following command:echo $cwd/NeatSeq-Flow/parse_blast/bin/parse_blast.Rand replacing /PATH_TO/parse_blast.R with the result.
Tip
You can skip a workflow step by adding a
SKIP:line at the step definition in the parameter file.For example to skip the kraken step:
Kraken:
    SKIP:
    module: kraken
    base: Trim_Galore
    script_path: {Vars.Programs_path.Kraken}
    qsub_params:
        -pe: '{Vars.Parallel_Environment.pe_name} {Vars.Parallel_Environment.Kraken}'
    redirects:
        --db: {Vars.Database.kraken}
        --preload: null
        --quick: null
        --threads: {Vars.Parallel_Environment.Kraken}
Note
Don’t forget to save the file when you’re done!
Tip
You can do the editting with any text editor of your liking. However:
The file needs to be in unix End Of Line (EOL) format.
Don’t forget to copy it to the project directory.
5. Run NeatSeq-Flow
In the command line type:
python NeatSeq-Flow/neatseq-flow/bin/neatseq_flow.py                                                      \
--sample_file Samples.nsfs                                           \
--param_file  Microbe-Flow.yaml  \
--message     "an informative message"
Note
If NeatSeq-Flow says :
Finished successfully....it is OK to move on.
6. Run Microbe-Flow
In the command line type:
sh scripts/00.workflow.commands.sh
7. Run the NeatSeq-Flow monitor
In the command line type:
neatseq_flow_monitor.py
Note
If you executed NeatSeq-Flow several times before running the workflow, you will have to select the correct log file in the upper window of the monitor. The log file is identified by the run code, which is composed of the date and time of NeatSeq-Flow execution.
Tip
The NeatSeq-Flow monitor is color-coded and for each step or sample:
- Green: indicate that No problems were detected.
- Red: indicate that Problems were detected[Step/sample finished with Errors or did not finished at all]
- Yellow: indicate that The step/sample is in progress
8. Checking the Workflow output
Browse the
data/directory for the outputs from the programs executed by Microbe-Flow.You can also check out the log files, the standard output and error files in the
logs/,stdout/andstderr/directories, respectively. It is especially informative when problems were identified in the The NeatSeq-Flow monitor
Perform a test run on a publicly available data
In order to perform a test run on a publicly available data, first follow steps 1 to 3 in Install using CONDA section.
Note
In this test run we will:
Set the Microbe-Flow current working directory
Use the samples from Skarp CPA et al. 2017 20 [Study: SRP090551]
Download and install GASSST and Gecko.
Download Campylobacter jejuni MLST and cgMLST schemes
Skip the Kraken step.
Run the analysis and view the results.
1. Set the Microbe-Flow current working directory:
In the command line type:
export MICROBE_FLOW_CWD=$PWD
2. Download and install GASSST:
In the command line type:
cd $MICROBE_FLOW_CWD
wget http://www.irisa.fr/symbiose/projects/gassst/Gassst_v1.28.tar.gz
tar -xvzf Gassst_v1.28.tar.gz
cd $MICROBE_FLOW_CWD/Gassst_v1.28
make
cd $MICROBE_FLOW_CWD
3. Download and install Gecko:
In the command line type:
cd $MICROBE_FLOW_CWD
wget https://bio.informatik.uni-jena.de/repository/dist-release-local/de/unijena/bioinf/genecluster/gecko/Gecko3.1.zip
unzip Gecko3.1.zip
4. Download Campylobacter jejuni MLST and cgMLST schemes:
In the command line type:
cd $MICROBE_FLOW_CWD
wget https://raw.githubusercontent.com/bioinfo-core-BGU/neatseq-flow-modules/master/Workflows/Microbe-Flow/get_scheme.sh

mkdir MLST
cd $MICROBE_FLOW_CWD/MLST
sh $MICROBE_FLOW_CWD/get_scheme.sh "Campylobacter jejuni" "MLST"
cd $MICROBE_FLOW_CWD
mkdir cgMLST
cd $MICROBE_FLOW_CWD/cgMLST
sh $MICROBE_FLOW_CWD/get_scheme.sh "Campylobacter jejuni" "cgMLST"
cd $MICROBE_FLOW_CWD
5. Download Samples file and MetaData file:
In the command line type:
cd $MICROBE_FLOW_CWD
wget https://raw.githubusercontent.com/bioinfo-core-BGU/neatseq-flow-modules/master/Workflows/Microbe-Flow/SRP090551_Samples.nsfs
wget https://raw.githubusercontent.com/bioinfo-core-BGU/neatseq-flow-modules/master/Workflows/Microbe-Flow/SRP090551_DATA.txt
6. Edit the Microbe-Flow parameter file to suit your cluster
In the command line type:
cd $MICROBE_FLOW_CWD
wget https://raw.githubusercontent.com/bioinfo-core-BGU/neatseq-flow-modules/master/Workflows/Microbe-Flow/Microbe-Flow_conda_test_run.yaml

sed -i $( echo 's:$MICROBE_FLOW_CWD:'$MICROBE_FLOW_CWD':') Microbe-Flow_conda_test_run.yaml
sed -i $( echo 's:/PATH_TO_YOUR_QSUB/:'$(dirname `which qsub`)':') Microbe-Flow_conda_test_run.yaml
nano  Microbe-Flow_conda_test_run.yaml
Tip
You can do the editting with any text editor of your liking. However:
The file needs to be in unix End Of Line (EOL) format.
Don’t forget to copy it to the project directory.
Attention
Edit the global params section [Especially the lines marked by <<]:
Global_params:
    Executor: Local # Change to your Executor SGE/SLURM/Local
    Qsub_opts: -cwd
    Qsub_q: your.q <<
    Default_wait: 10
Attention
Edit the Vars section [Especially the lines marked by <<]:
Vars:
    # For running using conda environments:
    conda:
        base: # Can be empty if running from conda environment
        env: Microbe-Flow
    # Set your Parallel Environment :
    Parallel_Environment:
        # Run 'qconf -spl' to view all the Parallel Environments [pe_name] available to you
        pe_name: <<
        # Set for each program the number/range of slots[cpus] to request per sample/project
        FastQC: '1' <<
        Snippy: '1' <<
        Spades: '1' <<
        Kraken: '1' <<
        Quast: '1' <<
        CARD_RGI: '1' <<
        Prokka: '1' <<
        Roary: '1' <<
        Gassst: '1' <<
Note
The Kraken step is marked as
SKIP:in the parameter file at the step definition section. Therefore, thekrakenstep will not be preformed!Kraken: SKIP: module: kraken base: Trim_Galore script_path: {Vars.Programs_path.Kraken} qsub_params: -pe: '{Vars.Parallel_Environment.pe_name} {Vars.Parallel_Environment.Kraken}' redirects: --db: {Vars.Database.kraken} --preload: null --quick: null --threads: {Vars.Parallel_Environment.Kraken}
7. Run NeatSeq-Flow
If you did not activate the NeatSeq-Flow environment:
In the command line type:
source activate NeatSeq_FlowTo generate the workflow scripts:
In the command line type:
neatseq_flow.py                                                   \
--sample_file $MICROBE_FLOW_CWD/SRP090551_Samples.nsfs            \
--param_file  $MICROBE_FLOW_CWD/Microbe-Flow_conda_test_run.yaml  \
--message     "This is a test run of Microbe-Flow"
Note
If NeatSeq-Flow says :
Finished successfully....it is OK to move on.
8. Run Microbe-Flow
In the command line type:
sh scripts/00.workflow.commands.sh
9. Run the NeatSeq-Flow monitor
In the command line type:
neatseq_flow_monitor.py
Note
If you executed NeatSeq-Flow several times before running the workflow, you will have to select the correct log file in the upper window of the monitor. The log file is identified by the run code, which is composed of the date and time of NeatSeq-Flow execution.
Tip
The NeatSeq-Flow monitor is color-coded and for each step or sample:
- Green: indicate that No problems were detected.
- Red: indicate that Problems were detected[Step/sample finished with Errors or did not finished at all]
- Yellow: indicate that The step/sample is in progress
10. Checking the Workflow output
Browse the
data/directory for the outputs from the programs executed by Microbe-Flow.You can also check out the log files, the standard output and error files in the
logs/,stdout/andstderr/directories, respectively. It is especially informative when problems were identified in the The NeatSeq-Flow monitor
Here are some of the results:
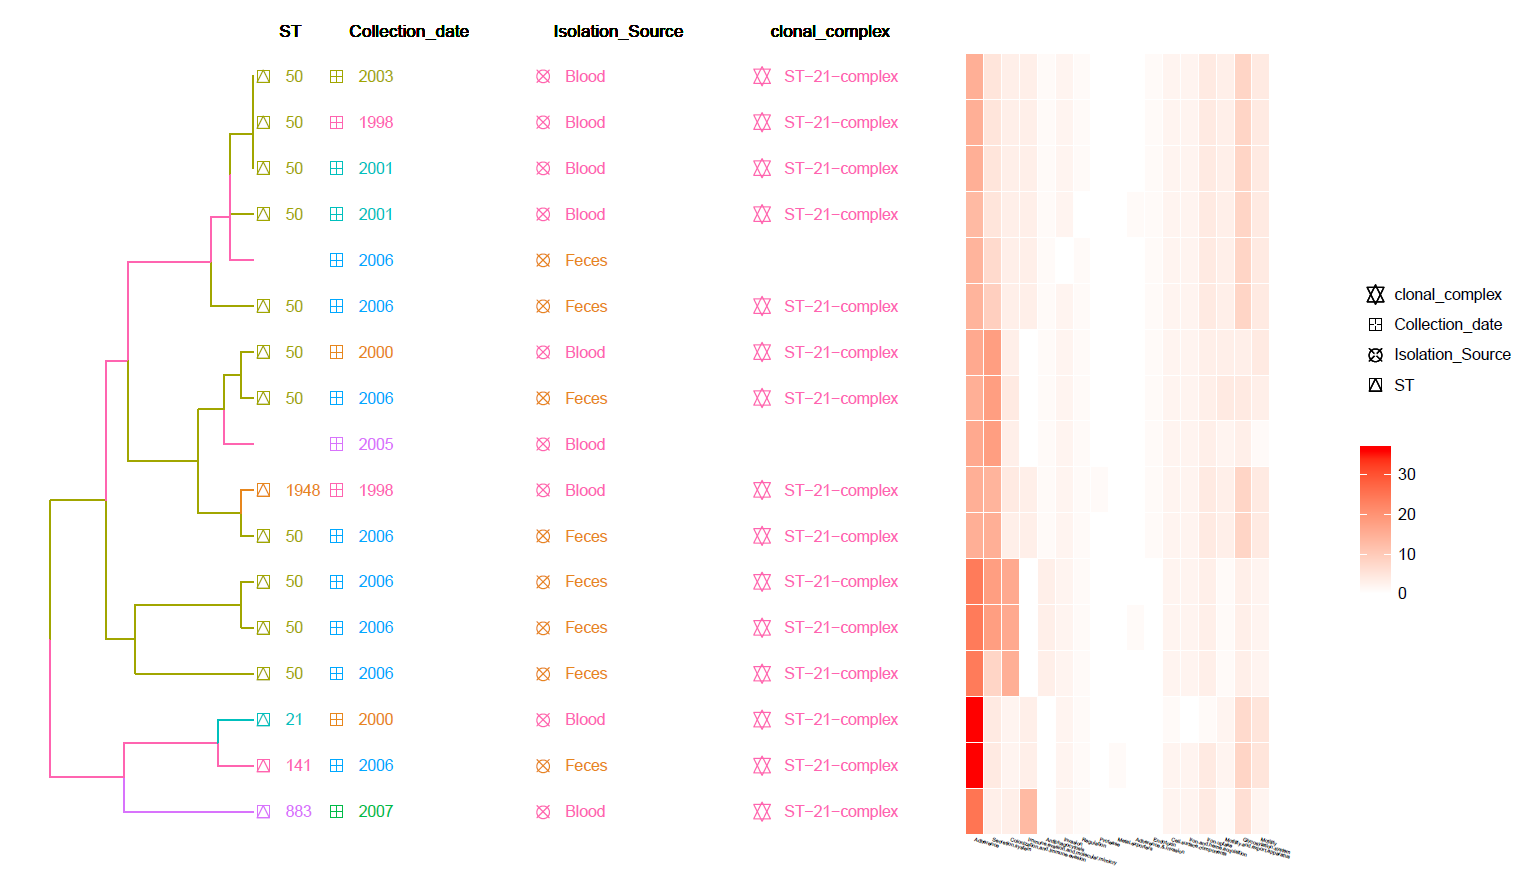
This is a core SNP Tree (generated by Gubbins and snippy) with Meta-Data information and Heat-Map of identified Resistance genes (by CARD RGI).
Can be found in the data/Tree_plot/ directory
This is a core SNP Tree with Meta-Data information and Heat-Map of identified Virulence genes (from VFDB).
Can be found in the data/Tree_plot/ directory
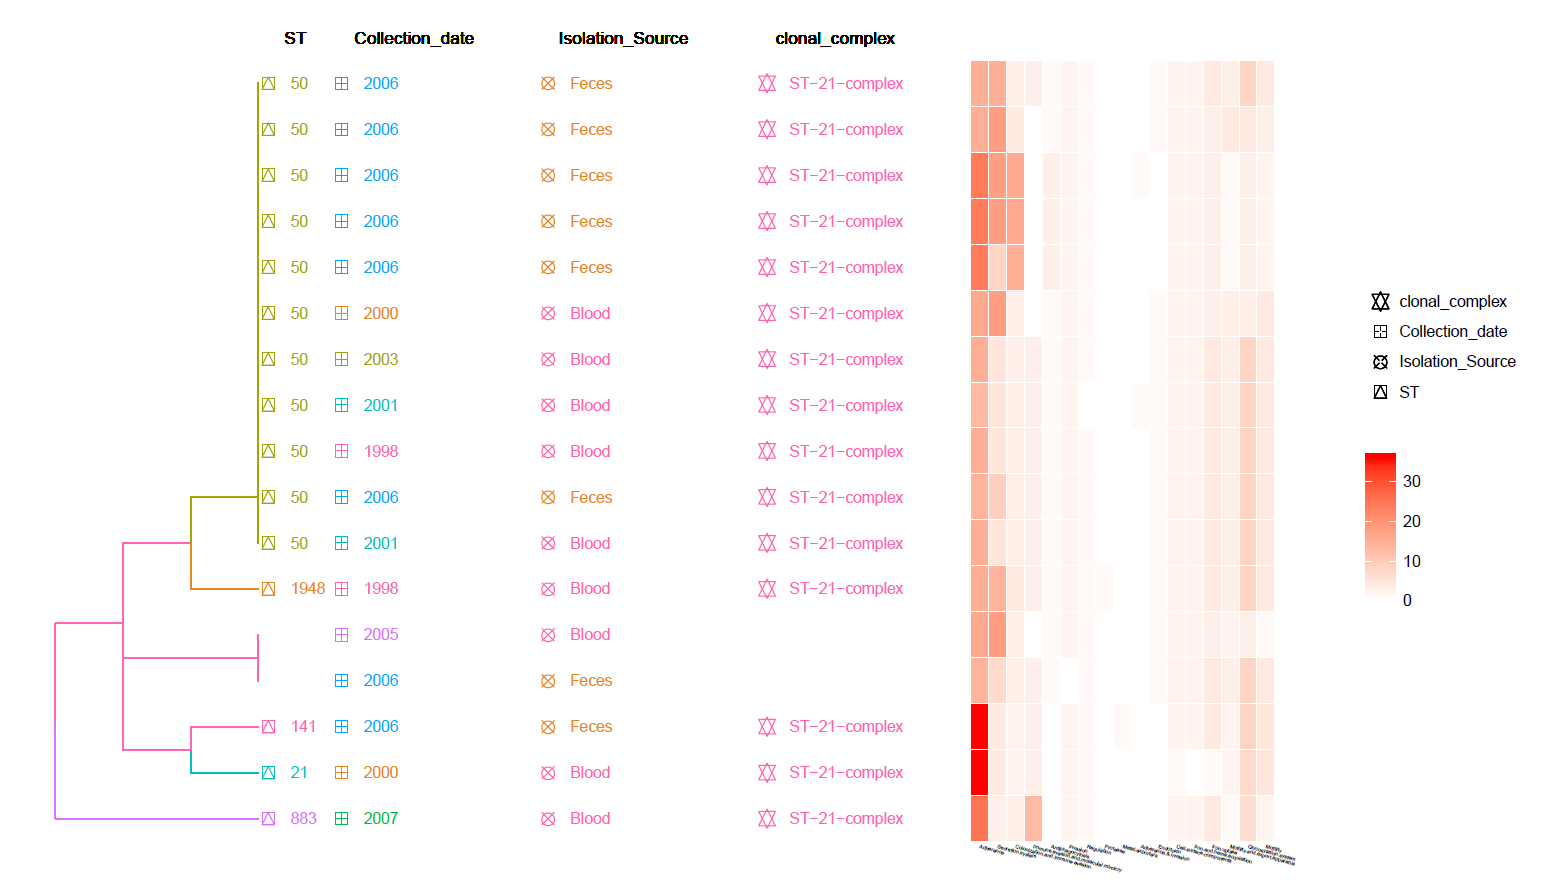
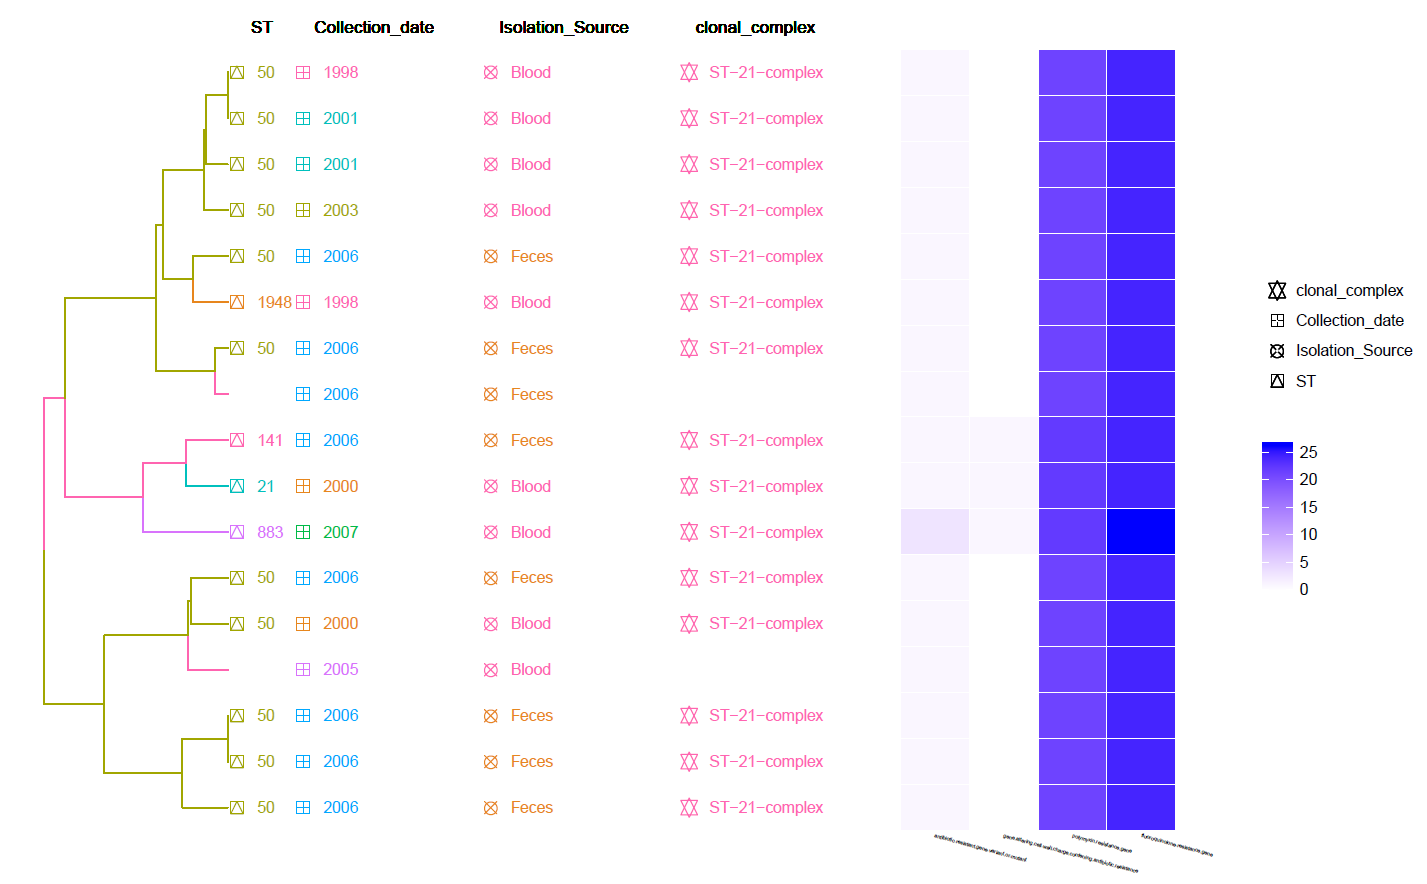
This is a MLST Hierarchical Clustering Tree with Meta-Data information and Heat-Map of identified Resistance genes (by CARD RGI).
Can be found in the data/Tree_plot/ directory
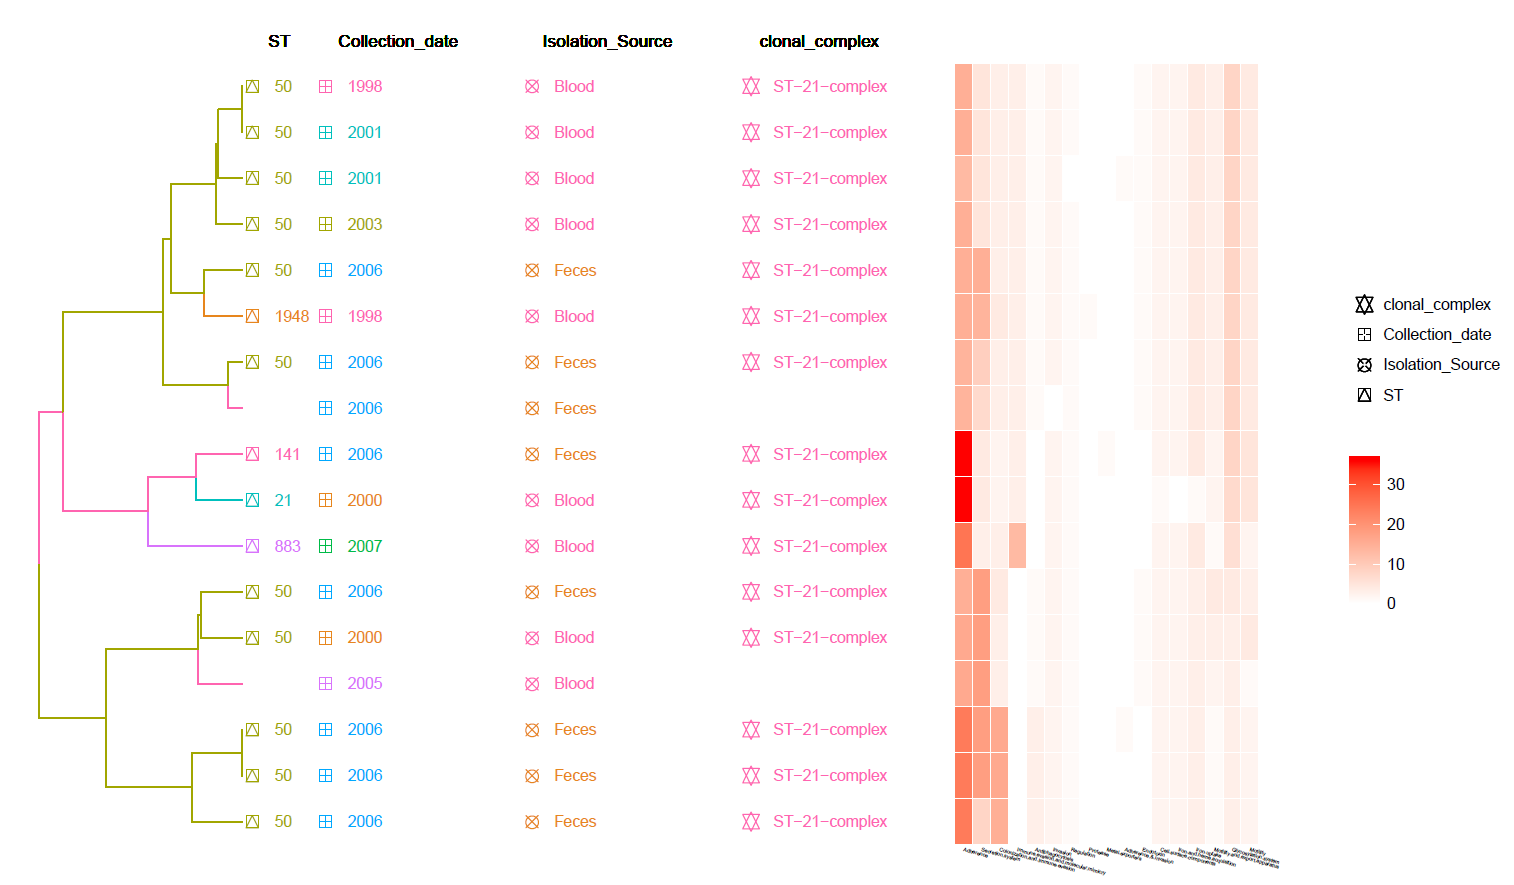
This is a MLST Hierarchical Clustering Tree with Meta-Data information and Heat-Map of identified Virulence genes (from VFDB).
Can be found in the data/Tree_plot/ directory
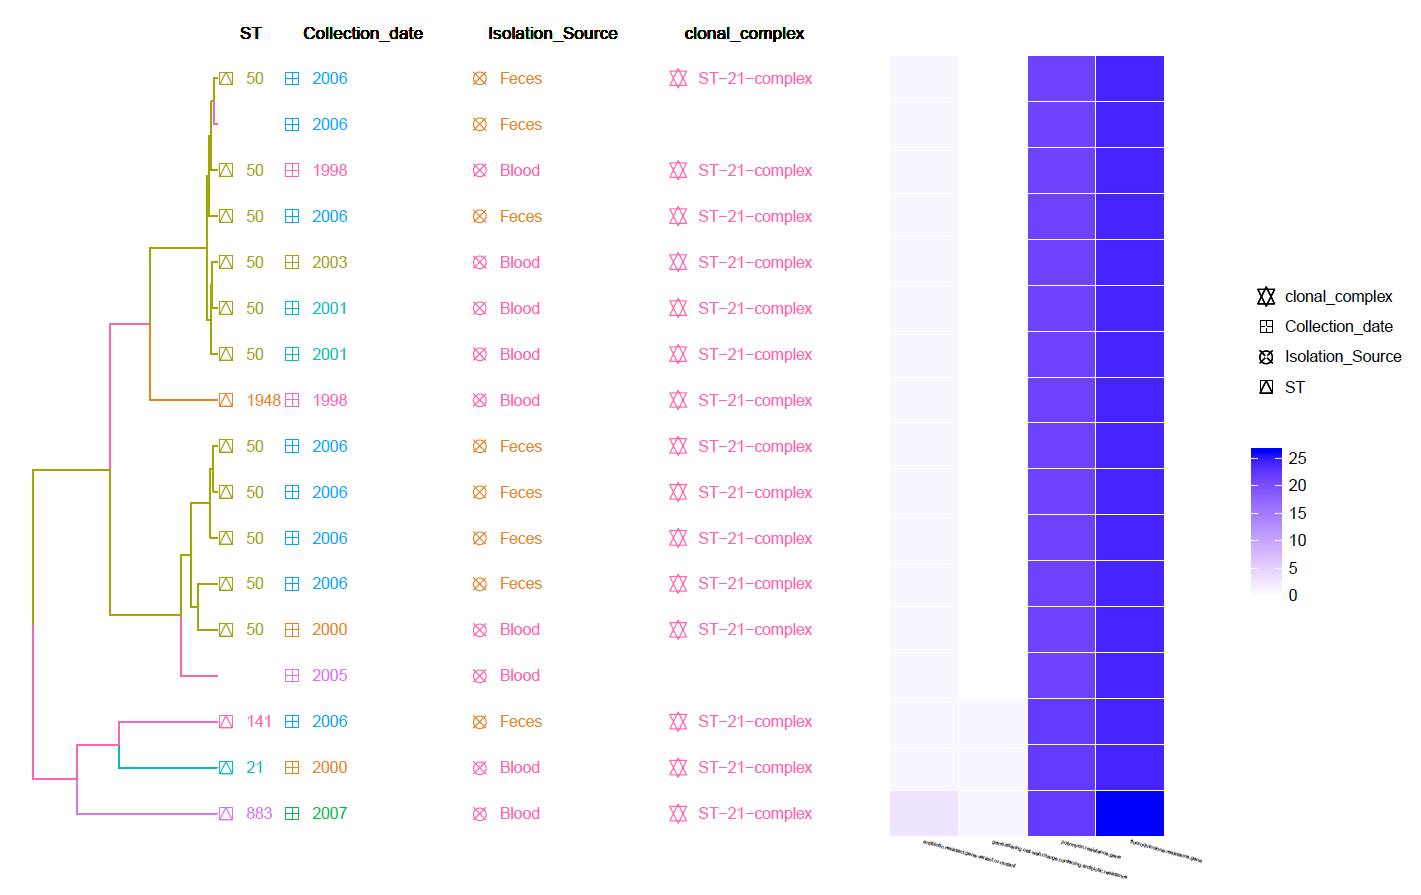
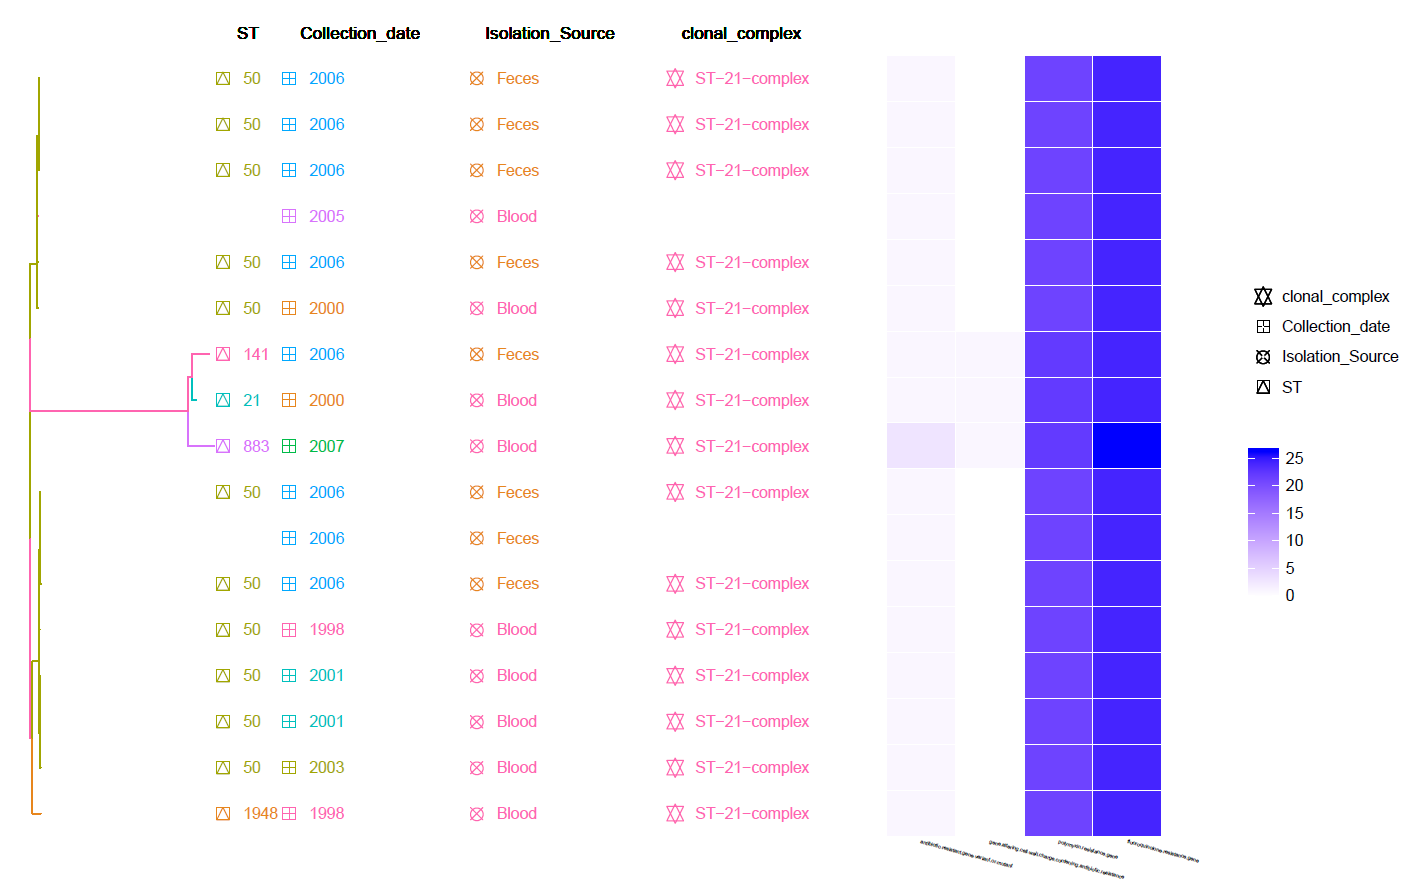
This is a cgMLST Hierarchical Clustering Tree with Meta-Data information and Heat-Map of identified Resistance genes (by CARD RGI).
Can be found in the data/Tree_plot/ directory

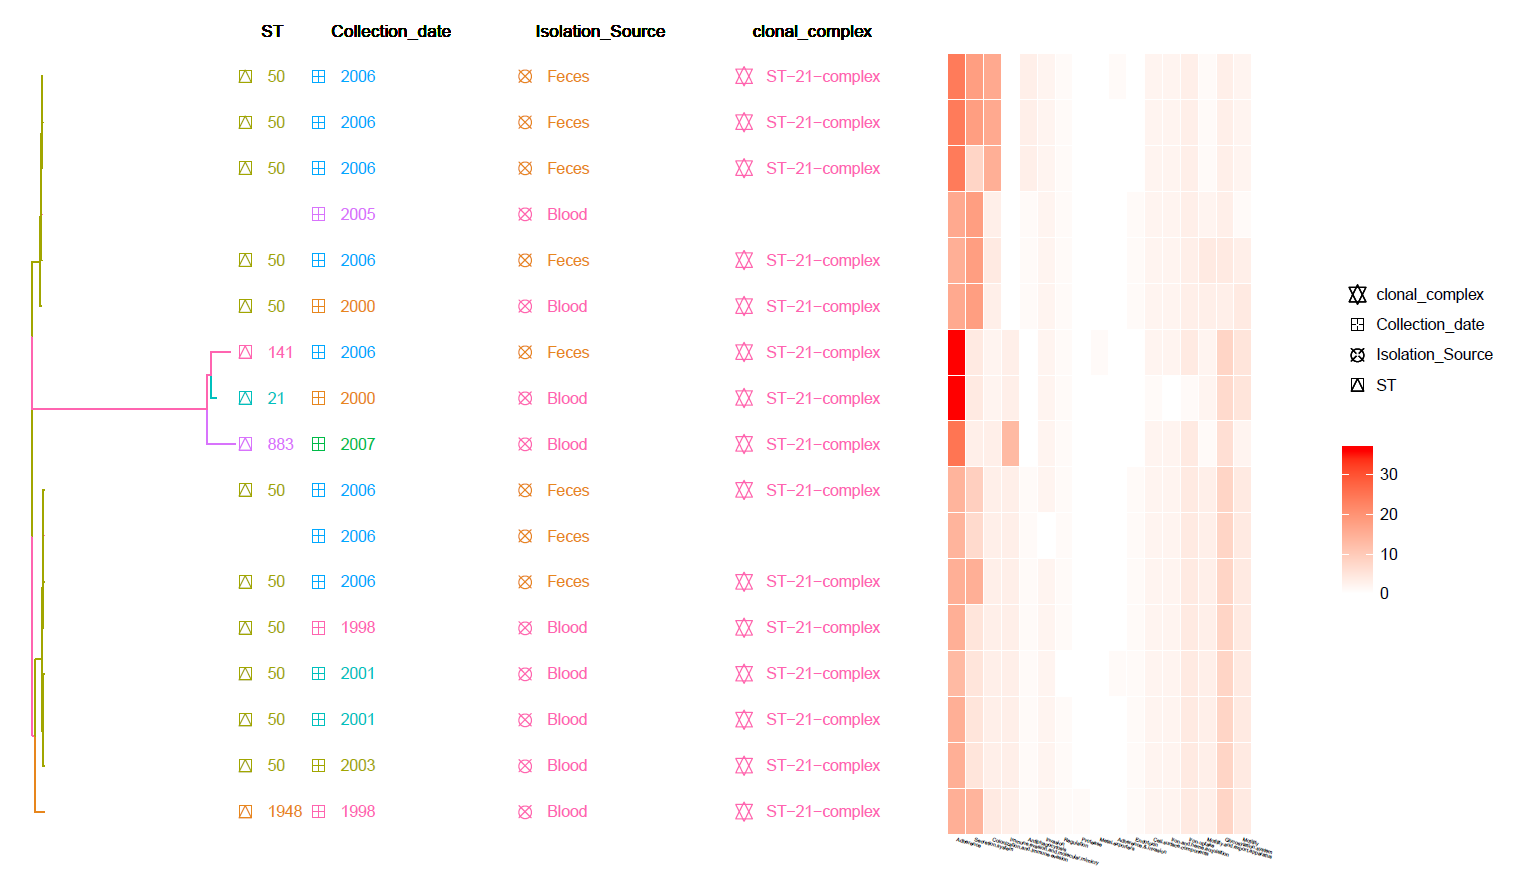
This is a cgMLST Hierarchical Clustering Tree with Meta-Data information and Heat-Map of identified Virulence genes (from VFDB).
Can be found in the data/Tree_plot/ directory
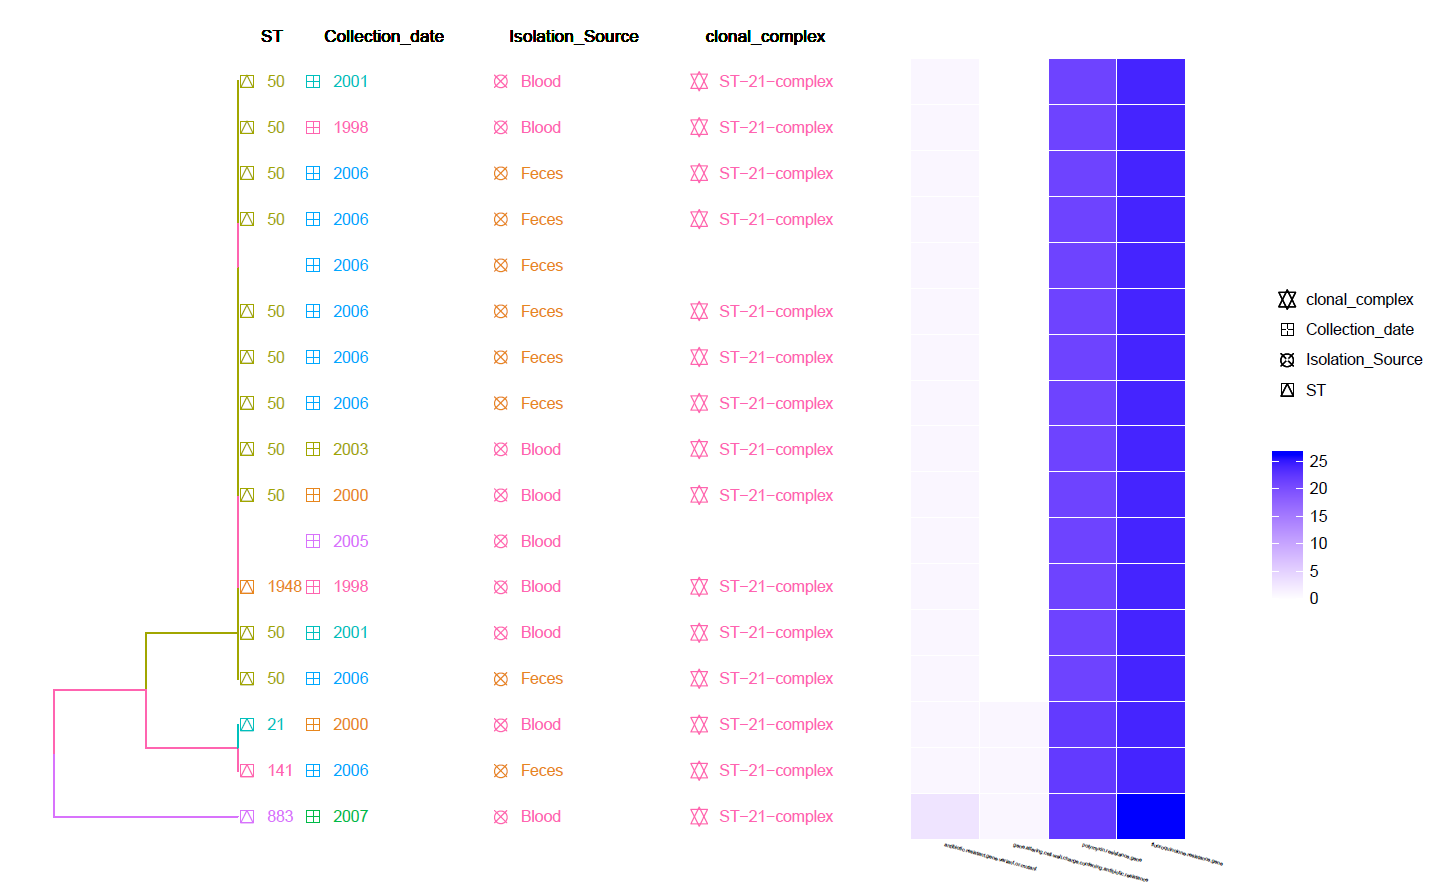
This is a Hierarchical Clustering Tree generated using the identified Resistance genes (by CARD RGI) Heat-Map and with Meta-Data information.
Can be found in the data/Tree_plot/ directory
This is a Hierarchical Clustering Tree generated using the identified Virulence genes (from VFDB) Heat-Map and with Meta-Data information.
Can be found in the data/Tree_plot/ directory
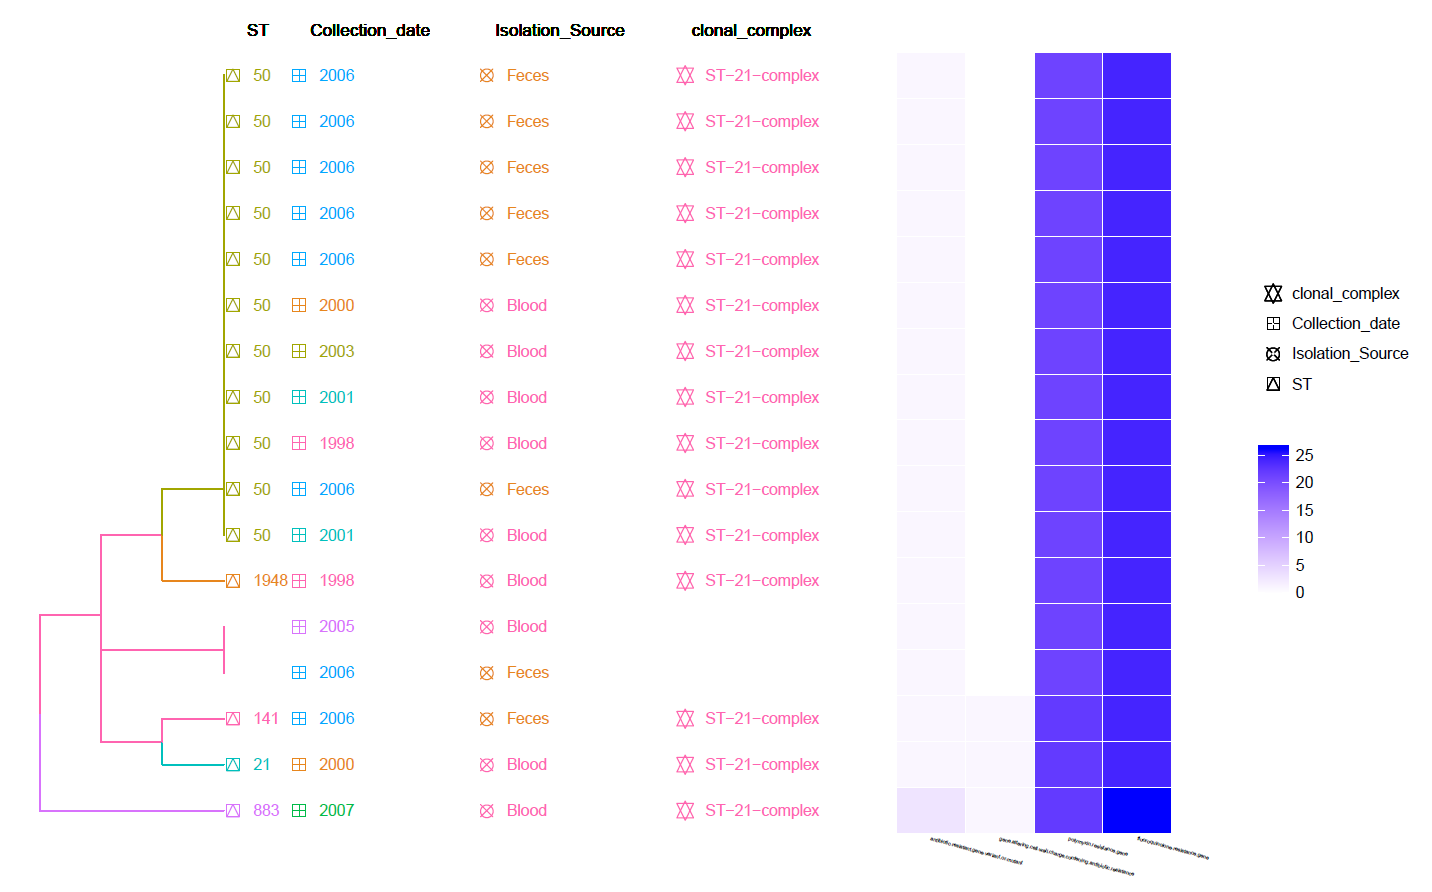
This is a Hierarchical Clustering Tree generated using the Pan-genome matrix with Meta-Data information and Heat-Map of identified Resistance genes (by CARD RGI).
Can be found in the data/Tree_plot/ directory
This is a Hierarchical Clustering Tree generated using the Pan-genome matrix with Meta-Data information and Heat-Map of identified Virulence genes (from VFDB).
Can be found in the data/Tree_plot/ directory
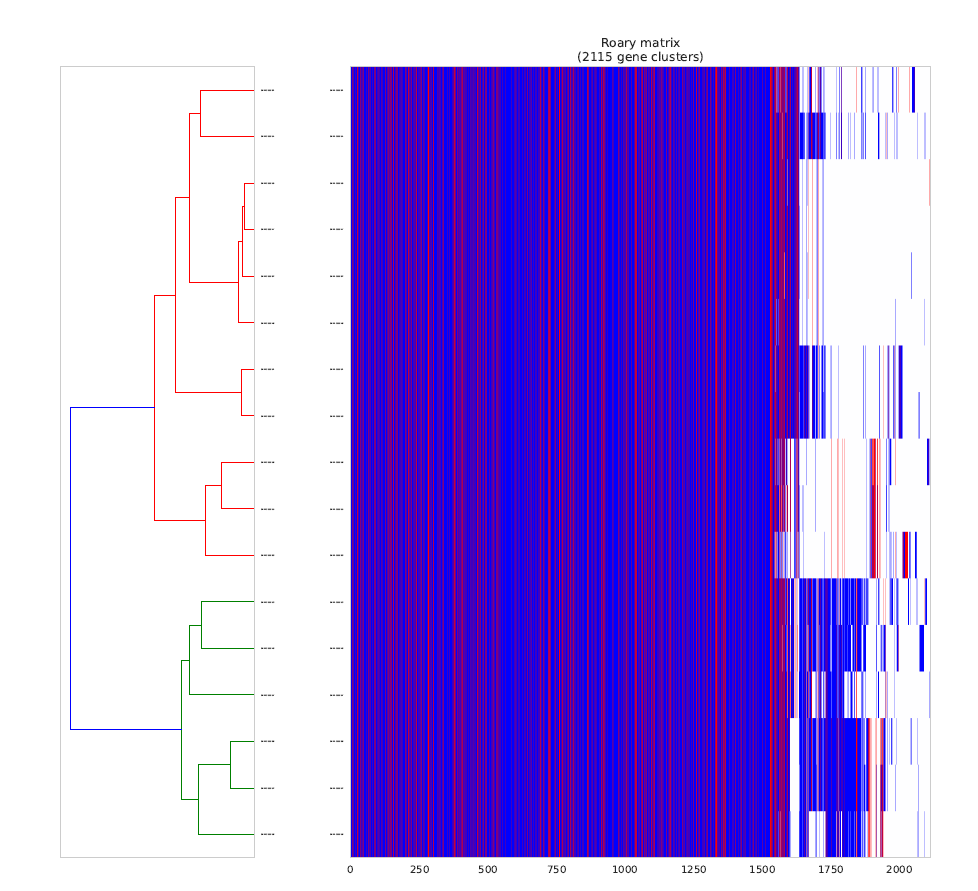
This is a Hierarchical Clustering of the Pan-genome matrix [red indicate identified Virulence/Resistance genes (from VFDB)]
Can be found in the data/Roary directory
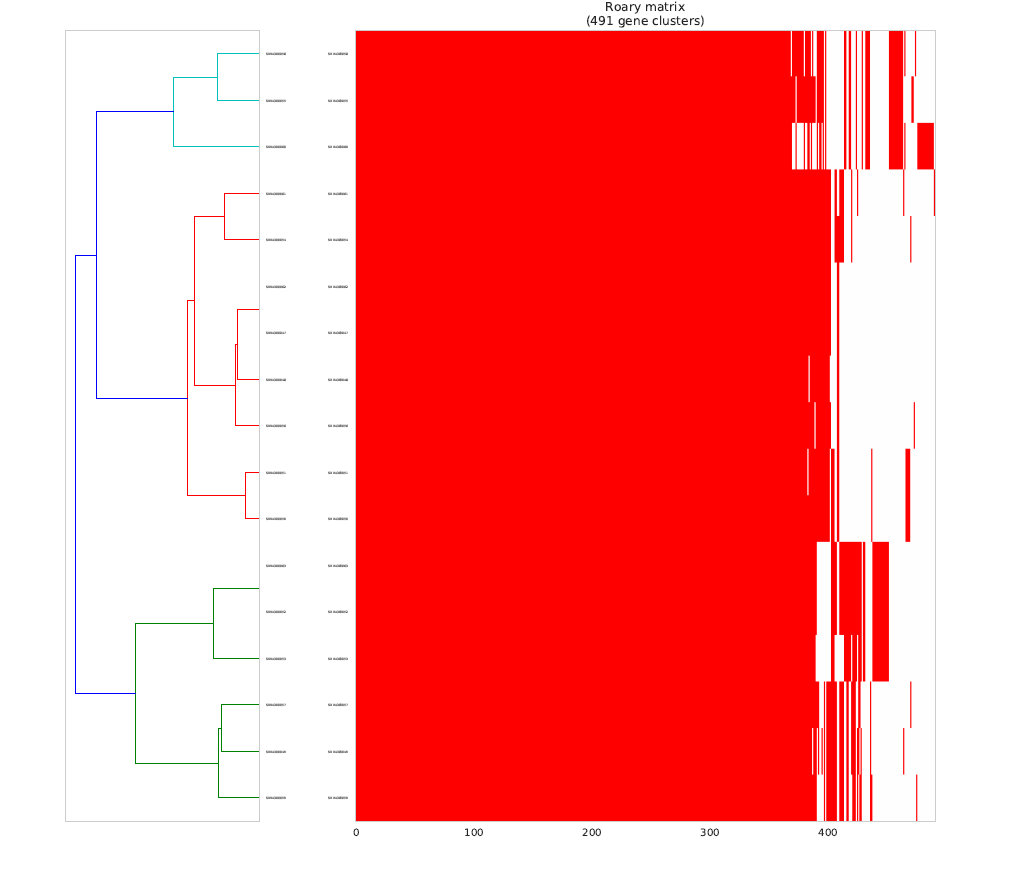
This is a Hierarchical Clustering of the Pan-genome matrix using only the identified Virulence/Resistance genes (from VFDB).
Can be found in the data/Roary directory
References
- 1
Martin, Marcel. “Cutadapt removes adapter sequences from high-throughput sequencing reads.” EMBnet journal 17.1 (2011):pp-10
- 2
Krueger F: Trim Galore. [http://www.bioinformatics.babraham.ac.uk/projects/]
- 3
Wood DE, Salzberg SL: Kraken: ultrafast metagenomic sequence classification using exact alignments. Genome Biology 2014, 15:R46.
- 4
Bankevich A., Nurk S., Antipov D., Gurevich A., Dvorkin M., Kulikov A. S., Lesin V., Nikolenko S., Pham S., Prjibelski A., Pyshkin A., Sirotkin A., Vyahhi N., Tesler G., Alekseyev M. A., Pevzner P. A. SPAdes: A New Genome Assembly Algorithm and Its Applications to Single-Cell Sequencing. Journal of Computational Biology, 2012
- 5
Gurevich, A., Saveliev, V., Vyahhi, N. and Tesler, G., 2013. QUAST: quality assessment tool for genome assemblies. Bioinformatics, 29(8), pp.1072-1075.
- 6
Ewels, P., Magnusson, M., Lundin, S. and Käller, M., 2016. MultiQC: summarize analysis results for multiple tools and samples in a single report. Bioinformatics, 32(19), pp.3047-3048.
- 7
Seemann, Torsten. “Prokka: rapid prokaryotic genome annotation.” Bioinformatics 30.14 (2014): 2068-2069.
- 8
McArthur, A.G., Waglechner, N., Nizam, F., Yan, A., Azad, M.A., Baylay, A.J., Bhullar, K., Canova, M.J., De Pascale, G., Ejim, L. and Kalan, L., 2013. The comprehensive antibiotic resistance database. Antimicrobial agents and chemotherapy, 57(7), pp.3348-3357.
- 9
Torsten Seemann: Snippy. https://github.com/tseemann/snippy
- 10
Croucher N. J., Page A. J., Connor T. R., Delaney A. J., Keane J. A., Bentley S. D., Parkhill J., Harris S.R. “Rapid phylogenetic analysis of large samples of recombinant bacterial whole genome sequences using Gubbins”. doi:10.1093/nar/gku1196, Nucleic Acids Research, 2014
- 11
Rizk, Guillaume, and Dominique Lavenier. “GASSST: global alignment short sequence search tool.” Bioinformatics 26.20 (2010): 2534-2540.
- 12
Page, Andrew J., et al. “Roary: rapid large-scale prokaryote pan genome analysis.” Bioinformatics 31.22 (2015): 3691-3693.
- 13
Brynildsrud, Ola, et al. “Rapid scoring of genes in microbial pan-genome-wide association studies with Scoary.” Genome biology 17.1 (2016): 238.
- 14
Csardi G, Kutalik Z and Bergmann S (2010). “Modular analysis of gene expression data with R.” Bioinformatics, 26, pp. 1376-7.
- 15
Yu G, Wang L, Han Y and He Q (2012). “clusterProfiler: an R package for comparing biological themes among gene clusters.” OMICS: A Journal of Integrative Biology, 16(5), pp. 284-287. doi: 10.1089/omi.2011.0118.
- 16
Winter, Sascha, et al. “Finding approximate gene clusters with Gecko 3.” Nucleic acids research 44.20 (2016): 9600-9610.
- 17
Nascimento, M., Sousa, A., Ramirez, M., Francisco, A. P., Carriço, J. A., & Vaz, C. (2016). PHYLOViZ 2.0: providing scalable data integration and visualization for multiple phylogenetic inference methods. Bioinformatics, 33(1), 128-129.
- 18
Yu G, Smith D, Zhu H, Guan Y and Lam TT (2017). “ggtree: an R package for visualization and annotation of phylogenetic trees with their covariates and other associated data.” Methods in Ecology and Evolution, 8, pp. 28-36. doi: 10.1111/2041-210X.12628
- 19
Jolley, K. A., & Maiden, M. C. (2010). BIGSdb: scalable analysis of bacterial genome variation at the population level. BMC bioinformatics, 11(1), 595.
- 20
Skarp, C. P. A., Akinrinade, O., Kaden, R., Johansson, C., & Rautelin, H. (2017). Accessory genetic content in Campylobacter jejuni ST21CC isolates from feces and blood. International Journal of Medical Microbiology, 307(4-5), 233-240.