Shotgun Metagenomics
- Author
Menachem Sklarz
- Affiliation
Bioinformatics Core Facility
- Organization
National Institute of Biotechnology in the Negev, Ben Gurion University.
Module categories
A workflow for executing various analyses on metagenomics data.
The workflow uses two approaches:
Analysis of the raw reads and
assembly of the reads and analysis of the assembled contigs.
Developed as part of a study led by Prof. Jacob Moran-Gilad.
Steps
- Analysis of the raw reads with:
kraken2metaphlan2kaijuHUMAnN2
The output from the former three programs is also plotted with
krona.
- Assembly and analysis of the assembled reads:
Assembly is done per-sample with
spades.The assemblies are quality-tested with
quast.Assemblies are annotated with
Prokka.Antibiotic resistance is determined with
CARD_RGI.Not included. Resistance and virulence can also be determined by BLASTing AR and virulence databases against the assemblies. See module BLAST.
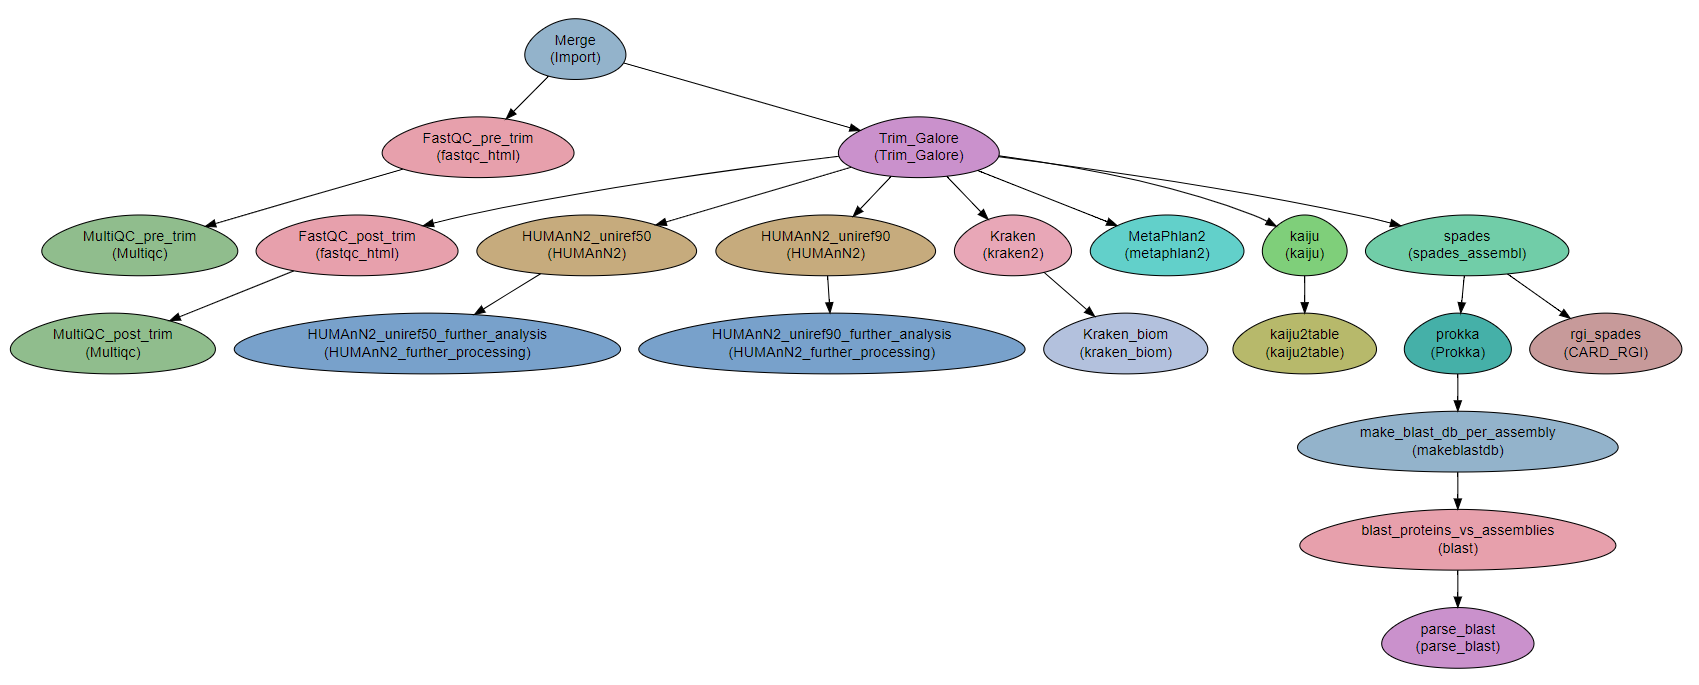
Workflow Schema
Requires
fastq files. Paired end or single-end.
Programs required
All the programs used in this workflow can be installed with conda. See section Quick start with conda.
Example of Sample File
Title       Metagenomics

#SampleID   Type    Path    lane
Sample1     Forward /path/to/Sample1_F1.fastq.gz 1
Sample1     Forward /path/to/Sample1_F2.fastq.gz 2
Sample1     Reverse /path/to/Sample1_R1.fastq.gz 1
Sample1     Reverse /path/to/Sample1_R2.fastq.gz 2
Sample2     Forward /path/to/Sample2_F1.fastq.gz 1
Sample2     Reverse /path/to/Sample2_R1.fastq.gz 1
Sample2     Forward /path/to/Sample2_F2.fastq.gz 2
Sample2     Reverse /path/to/Sample2_R2.fastq.gz 2
Download
The workflow file is available here
Quick start with conda
For easy setup of the workflow, including a sample dataset, use the following instructions for complete installation with conda:
Download the conda environment definition file:
You can
download the Metagenomics_conda.yaml filehere, or programatically with:curl -LO https://raw.githubusercontent.com/bioinfo-core-BGU/neatseq-flow-modules/master/docs/source/_extra/Metagenomics_conda.yaml
Create and activate a conda environment with all the required programs:
conda env create -f Metagenomics_conda.yaml
source activate Metagenomics
Create a sample file. It should look like the following, only the file names should be replaced with absolute file names:
Title   Trinity_example

#SampleID       Type    Path
Sample1 Forward 00.Raw_reads/reads.left.fq.gz
Sample1 Reverse 00.Raw_reads/reads.right.fq.gz
Tip
To get the full path to a file, use the following command:
readlink -f 00.Raw_reads/reads.left.fq.gz
Create a directory for your databases. Save the location of the directory in
$DBDIR.export DBDIR=/path/to/databases_dir mkdir -p $DBDIR
Install required databases
Warning
Installing the databases requires about 220 GB of disk space!
Tip
File
Metagenomics_DBinstall_cmds.shcontains a script for installing all the databases described below.Execution might take a while due to the large datasetb being downloaded, therefore it is recommended to execute as follows (After setting $DBDIR!!!):
curl -LO https://raw.githubusercontent.com/bioinfo-core-BGU/neatseq-flow-modules/master/docs/source/_extra/Metagenomics_DBinstall_cmds.sh
nohup bash Metagenomics_DBinstall_cmds.sh &
- MetaPhlAn2
Running MetaPhlAn2 will download the database for you:
metaphlan2.py \
    --input_type fastq \
    --bowtie2_exe bowtie2 \
    --bowtie2db $DBDIR/MetaPhlAn_temp
- Kraken2
Installing Kraken2 database takes a long time and requires about 100 GB of disk space.
mkdir -p $DBDIR/kraken2
kraken2-build \
    --standard \
    --threads 10 \
    --db $DBDIR/kraken2
Attention
If
rsyncdosen’t work for you, you can try adding the--use-ftpto thekraken2-buildcommand to usewgetinstead.- krona
ktUpdateTaxonomy.sh $DBDIR/krona/taxonomy
- Kaiju
Kaiju provides different databases for downloading. To get a list of options, just execute
kaiju-makedbwith no arguments:The following commands demonstrate how to get the
nrdatabase including eukaryotes (nr_euk) and theprogenomesdatabase.mkdir -p $DBDIR/kaiju cd $DBDIR/kaiju kaiju-makedb -s progenomes -t 10 kaiju-makedb -s nr_euk -t 10 cd -
- HUMAnN2
Online help on downloading databases.
mkdir -p databases/HUMAnN2
humann2_databases --download chocophlan full  $DBDIR/HUMAnN2
humann2_databases --download uniref uniref90_diamond  $DBDIR/HUMAnN2/uniref90
humann2_databases --download uniref uniref50_diamond  $DBDIR/HUMAnN2/uniref50

humann2_config --update database_folders nucleotide $DBDIR/HUMAnN2/chocophlan
humann2_config --update database_folders protein $DBDIR/HUMAnN2/uniref90
Attention
The commands download the recommended translated databases. For other options, see the Download a translated search database section of the HUMAnN2 tutorial.
Get
the parameter filewith:curl -LO https://raw.githubusercontent.com/bioinfo-core-BGU/neatseq-flow-modules/master/Workflows/Metagenomics.yaml
Settings to set in the parameter file
You will have to make some changes to the parameter file to suit your needs:
Set the parameters in the
Global_paramssection to suit your cluster. Alternatively, setExecutortoLocalfor running on a single machine.In the
Varssection, setdatabase_prefixto the location of your databases dir, which is the value of$DBDIRset above. If$DBDIRis set, you can use the followingsedcommand to set thedatabase_prefixcorrectly:sed -i s+\$DBdir+$DBDIR+ Metagenomics.yaml
In
Vars.databases.kaiju, you will have to make sure the value offmifits the database you decide to use. In the provided parameter file, thenr_eukis set. The equivalentfmivalue for theprogenomesdatabase is commented out.Go over the
redirectssections in the parameter file and make sure they are set according to your requirements.If you have a fasta file with sequences to search for within your metagenome assemblies, set the
proteins_of_interestvariable to the full path to that file. If not, you can delete or uncomment theSKIPline in stepsmake_blast_db_per_assembly,blast_proteins_vs_assembliesandparse_blast.
In the conda definitions (line 46), set
base:to the path to the conda installation which you used to install the environment.You can get the path by executing the following command, when inside the Metagenomics conda environment:
echo $CONDA_EXE | sed -e 's/\/bin\/conda$//g'
Tip
See also this nice presentation by Galeb Abu-Ali, Eric Franzosa and Curtis Huttenhower