RNA-Seq using a reference genome
- Author
Liron Levin
- Affiliation
Bioinformatics Core Facility
- Organization
National Institute of Biotechnology in the Negev, Ben Gurion University.
Page Contents:
Note
In order to use this Work-Flow first:
Install NeatSeq-Flow using conda
Make sure that conda is in your PATH.
Steps:
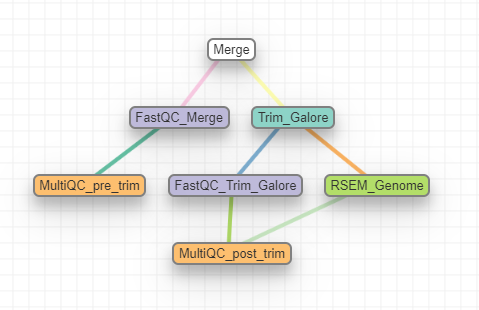
Merge Decompression and Concatenation (IF NEADED) of read files into single files per direction.
FastQC_Merge Quality tests on the original reads using FastQC.
MultiQC_pre_trim Quality report on the original reads using MultiQC.
Trim_Galore Reads trimming using Trim_Galore.
FastQC_Trim_Galore Quality tests on reads after trimming using FastQC.
RSEM_Genome indexing of the reference genome, mapping of the post trimming reads and count data creation.
MultiQC_post_trim Quality report on the trimmed reads and mapping information using MultiQC.
Workflow Schema
Note
It is possible to add a DeSeq2 step for Differential Expression, Clustering and Functional Analyses. For more information see the DESeq2 Tutorial
Requires
Paired end or single-end reads fastq files. .
A reference genome in fasta format
An annotation file in gtf format
Programs required
Note
The programs are installed as part of the installation process using CONDA.
Example of Sample File
Create a tab-delimited sample file. It should look as follows:
Title       RNA_seq

#SampleID   Type    Path
Sample1     Forward /path/to/Sample1_F1.fastq.gz
Sample1     Forward /path/to/Sample1_F2.fastq.gz
Sample1     Reverse /path/to/Sample1_R1.fastq.gz
Sample1     Reverse /path/to/Sample1_R2.fastq.gz
Sample2     Forward /path/to/Sample2_F1.fastq.gz
Sample2     Reverse /path/to/Sample2_R1.fastq.gz
Sample2     Forward /path/to/Sample2_F2.fastq.gz
Sample2     Reverse /path/to/Sample2_R2.fastq.gz
Note
You can edit the file in excel but make sure to save it in tab-delimited format. See this section of the manual for a full description of the sample file format.
Quick start with conda
Install all the required programs in to a conda environment:
Download the
RNASeq conda environment installer file:curl -LO https://raw.githubusercontent.com/bioinfo-core-BGU/neatseq-flow-modules/master/docs/source/_extra/RNASeq_env_install.yamlCreate the RNASeq conda environment:
conda env create -f RNASeq_env_install.yaml
Download the Work-Flow’s Parameter file:
curl https://raw.githubusercontent.com/bioinfo-core-BGU/neatseq-flow-modules/master/Workflows/RNASeq_STAR.yaml > RNASeq.yamlcurl https://raw.githubusercontent.com/bioinfo-core-BGU/neatseq-flow-modules/master/Workflows/RNASeq_Bowtie2.yaml > RNASeq.yaml
Activate the NeatSeq_Flow conda environment:
bash
source activate NeatSeq_Flow
- Edit the “Vars” section in the Work-Flow’s Parameter file:
Specify the location of the gtf and reference genome files
Note
It is recommended to use the NeatSeq-Flow GUI in order to:
Edit the Work-Flow’s Parameter file
Create a Samples file
Generate and run the Work-Flow’s scripts.
NeatSeq_Flow_GUI.py
Learn more about How to use NeatSeq-Flow GUI
Alternatively, It is possible to use a text editor.
Generate the scripts by typing in the command line:
neatseq_flow.py -s Samples_file.nsfs -p RNASeq.yaml
Run the Work-Flow by typing in the command line:
bash scripts/00.workflow.commands.sh 1> null &
Run the Work-Flow monitor by typing in the command line:
neatseq_flow_monitor.py